Tartiflette

Tartiflette, is the kind of food that stole my heart right from the get-go. In 2021, Paris, Christmas vibes, freezing temps, and my cozy food radar going bonkers. So, there I am, at the Christmas market in Les Jardins de Tuileries! While my husband and daughter are out there braving the cold, playing without their gloves at the Carnival Balloon Shoot, I’m on a culinary adventure! From one food booth to another, I’m on a mission to try every Alpine dish out there: raclette, fondue, tartiflette, poêlée montagnarde, -you name it.

But let me tell you, the one that stole the show for me was tartiflette. While the fam’s freezing their fingers off, I’m warming up my insides with this magical creation. It’s the kind of recipe with just four ingredients that I adore, especially when I’m not in the mood for a marathon cooking session.

This gem hails from the Savoie department in the French Alps. The name? Well, “tartifle” in Savoyard dialect means “potato”. Picture this: potatoes, cheese, onions, and bacon all coming together in a dance of flavors. The VIP of the dish? Reblochon cheese, but since I couldn’t get my hands on it today, I went for Coulommiers, another soft-ripened French cheese.

This delicious recipe is a perfect winter dinner. So, if you’re on the lookout for a meal that’ll hug your soul, tartiflette’s the answer. Cheers to simple joys and cozy eats!

Ingredients

  • 750g potatoes, peeled and sliced
  • 2 sprigs of thyme (optional)
  • 200g smoked bacon lardons
  • 20g butter
  • 1 large onion, sliced
  • ½ cup white wine (optional)
  • 150ml crème fraîche
  • 240g Reblochon, rind and all, sliced

Preparation

  1. Heat the oven to 180°C. Bring a pan of salted water to a boil, add the potatoes and thyme, and cook for 6 minutes until just tender. Discard the thyme leaves and drain.
  2. Turn a skillet to medium heat and cook the bacon pieces until they reach your desired doneness (5 to 8 minutes). Remove from the skillet and set aside.
  3. In the same pan, melt the butter over medium heat and fry the onion for 5 minutes. Return the bacon to the pan with the wine and cook until the onions are golden.
  4. Lightly butter an oven dish. Cover the base with the potatoes, then spoon over the onion mixture and the crème fraiche. Mix gently and top it with cheese. Bake in the oven for 30 minutes until bubbling and deeply golden. Leave to stand for 5 minutes, then serve.
Creamy Chicken Curry

Photography: Serge Oryan

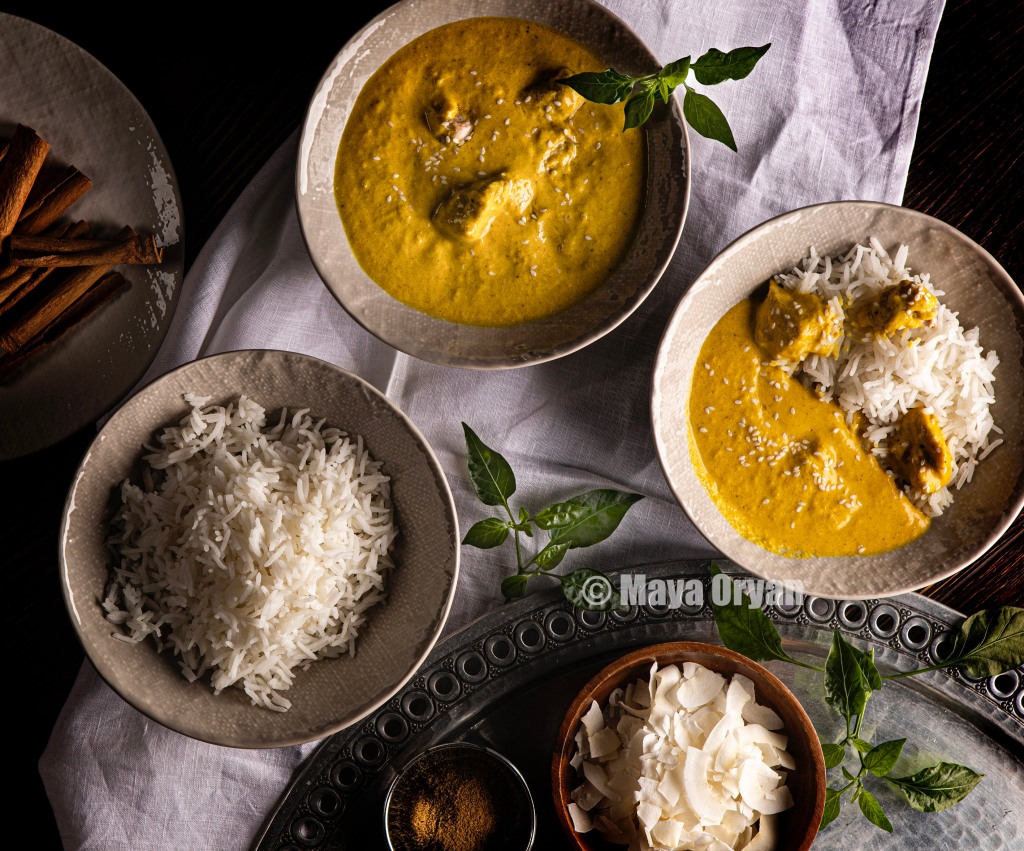
Hello world! On my side of the continent, temperatures have been very low and our constant search has been lately exclusive for comfort food and soups. My curry recipe is very versatile. The version I’m sharing today is the one that my entire family approves, but I remember cooking this recipe sometimes for lent, using vegetable stock and coconut cream and omitting chicken, (which obviously makes it also vegan). I sometimes add, after blending, boiled cauliflower, pineapple pieces or unsalted cashew nuts. I also like sometimes to have it as a soup by adding one extra cup of stock before blending to have a thinner texture. It not only tastes delicious but it is also very aromatic and can be served on special occasions.

Ingredients

  • 1 tablespoon cooking oil
  • 2-3 chicken breasts, cut into pieces
  • Salt and pepper to taste
  • 1 tsp oregano
  • 1 tablespoon olive oil
  • 200g pumpkin, diced (optional)
  • 1 medium onion, diced
  • 1 teaspoon freshly grated ginger
  • 2 teaspoons curry powder
  • 1 teaspoon ground cumin
  • ½ teaspoon ground turmeric
  • 2 cups fresh tomatoes, peeled and diced
  • 1 cup chicken stock
  • 1 banana, ripen and sliced
  • 1 apple, peeled, cored and diced
  • 2 cups cooking cream or coconut cream

Preparation

  1. In a large pot, drizzle oil and place chicken pieces to cook. Season with salt, pepper and oregano. Continue to fry until fully cooked. Remove chicken pieces and set aside.
  2. In same pot, coat again with oil and add pumpkin and onion. Sauté until soft.
  3. Stir in ginger, curry powder, cumin and turmeric and continue to sauté for about 1 minute then add tomatoes.
  4. Stir in the stock and continue to cook for about 5 minutes or until it starts to simmer.
  5. Add banana and apple pieces and cook for another 10 minutes.
  6.  Off heat, blend the mixture with hand stick blender or by transferring it to a food processor. Blend until smooth. Return mixture to the pot with the cooked chicken and add the cream to heat just few minutes, without bringing it to a boil.
  7. Garnish with sesame, seeds or shredded coconut, and serve with Basmati rice.

APPLE CRANBERRY CAKE WITH CINNAMON FROSTING

APPLE CRANBERRY CAKEApple – Cranberry – Clementine – Cinnamon… These are the necessary key words to make you want to bake this elegant Christmas cake.

Nothing beats a smoothly frosted cake semi-naked look, I promise you it’s so easy to prepare anyone should give it a chance.

I couldn’t resist, but taking photos from different angles and post them on all of my social medias accounts.

I have tried many recipes for the festive season. I hope I’ll get the chance to share them all, since all of my spare time lately has been spent on Christmas shopping hearing Georges Michael and Mariah Carrey songs on repeat.

APPLE CRANBERRY CAKE WITH CINNAMON FROSTING FLAVOR

Ingredients

  • 1 cup whipping cream
  • 1 teaspoon ground cinnamon
  • 200g unsalted butter (at room temperature)
  • 1 ½ cup sugar
  • 4 eggs
  • 1tsp vanilla
  • 4 cups flour, sifted
  • 2 tsp baking powder
  • 1 tsp baking soda
  • ½ tsp salt
  • ¼ cup Clementine juice
  • ¼ cup dried cranberries
  • 1-2 red apples, cored and sliced (skin on)
  • 1 tsp brown sugar
  • ½ tsp cinnamon
  • 1tbsp limoncello

Preparation

  1. To make the frosting, add 1 teaspoon of cinnamon to the whipping cream and whisk on high speed for 3 minutes or until fluffy. Refrigerate.
  2. Preheat oven to 175° C. Butter and flour a cake pan.
  3. Beat butter and sugar together until light and fluffy, add eggs, vanilla, flour, baking powder, baking soda and salt.
  4. Pour Clementine juice gradually while mixing and scraping down the bowl with a spatula as you go. Turn off the mixer and fold in the cranberries.
  5. Pour the batter in the cake pan and decorate with the apple slices arranging them close together and overlapping on top of the batter.
  6. Mix brown sugar and cinnamon together and sprinkle this over the apples. Drizzle with limoncello liqueur (or lemon juice).
  7. Bake for 45-55 minutes. Cake is done when a toothpick inserted in the center comes out clean.
  8. Cool the cake in the pan on a wire rack.
  9. Frost the cake with your chilled cinnamon icing. Sprinkle with icing sugar. Decorate with cinnamon sticks, kumquat and fresh cranberries, if desired.

Blueberry Cake

Bueberry Cake.jpg

Hello hungry people:) I have good news for you, this cake recipe is so simple that even the most amateur cook may bake it. And with the almond crumble that tops it, you will end up with a celebratory treat to serve on ceremonial occasions like Christmas.

What makes this cake looks fabulous is the Bundt pan and the glaze. So if you are tempted to try this recipe please don’t skip these two steps, especially the topping.

Happy Baking!

Ingredients

  • 1 ½ cup sugar
  • 1 cup / 2 sticks unsalted butter
  • 3 eggs
  • 2 teaspoons vanilla
  • 2 ¾ cups all-purpose-flour
  • ½ teaspoon salt
  • 1 teaspoon baking soda
  • 2 teaspoons baking powder
  • ½ cup milk
  • 3 tablespoons lemon zest
  • 1 cup fresh or frozen (and thawed) blueberries

For the topping

  • 3 tablespoons icing sugar
  • 1 tablespoon lemon juice
  • 3 tablespoons flour
  • 2 tablespoons dark brown sugar
  • 2 tablespoons oats
  • 2 tablespoons almonds, broken or sliced
  • 2 tablespoons butter, at room temperature

Preparation

  1. Preheat the oven to 185 degrees C. Grease and flour a 12-cup pan.
  2. In a large bowl, beat butter and sugar together until light and fluffy, about 3 minutes. Beat in eggs, one at a time. Beat in vanilla.
  3. Sift flour, salt, baking soda, and baking powder in a large bowl. Add gradually to butter mixture. Beat until well mixed, making sure to scrape down the bowl with a spatula.
  4. Fold in lemon zest and blueberries and transfer to pan.
  5. Bake for 60-70 minutes or until a toothpick inserted in the center comes out clean.
  6. Remove the cake from the oven and let it cool on a wire rack for at least ten minutes before trying to remove it from the pan.
  7. To make the topping, combine flour, sugar, oat and almonds. Add the butter and rub the mixture with your fingers to make small clumps. Spread the mixture on a baking tray and cook in oven for 7-10 minutes. Let cool. To make the glaze, whisk together icing sugar and lemon juice. To finish, drizzle the glaze over the cake and immediately sprinkle with the almond mixture and wait for the glaze to dry before serving.


Honey Tahini Cookies -(feat.video tutorial)

IMG_5765

I always wanted to post one of my recipe videos but kept on postponing thinking that it might be boring; until today, I was watching this recipe with my little daughter when she told me “this looks super easy, lets make some straight away!”

Not only I was happy that it took her only once to watch the video and wanting to try the recipe out, but also I was encouraged to upload my video and not to be nervous anymore about it.

If you love Halawa (Halva) you will love these cookies. They are both crisp and chewy and totally easy to make. The combination of Tahini and honey tastes like Halawa and who wants to resist this flavor.

These cookies will be your new favorite!

Honey Tahini Cookies

Makes 30

Ingredients:

  • 1 stick / 100g butter, at room temperature
  • ¾ cup sugar
  • ½ cup tahini
  • 1 tbsp honey
  • 1 tbsp orange blossom water
  • 1 ½ cups all-purpose flour
  • 1 tsp baking soda
  • Pinch of salt

Directions:

  1. In a stand mixer, beat butter and sugar on medium-high until light and fluffy.
  2. Gradually add the tahini, honey and orange blossom water.
  3. In a medium size bowl, whisk flour, baking soda and salt together. Reduce the mixer speed to low and slowly add the flour to tahini mixture, combining well until forming a dough.
  4. Chill in the refrigerator for about an hour.
  5. Preheat oven to 170°C or 350°
  6. Line baking sheets with parchment paper. Using your hands, take a walnut size of dough and shape into balls. Arrange them on the cookie sheet at least 2 inches / 5cm apart. Dip the tines of a fork in flour and gently press a crisscross pattern into each ball. Dip fork in flour after every cookie to avoid sticking.
  7. Bake in the middle rack of the oven for 13-15 minutes or until the cookies begin to show cracks.

Maamoul With Pistachios or Walnuts

Maamool-MayaOryan

It’s this time of the year where the neighborhood smells sweet. Housewives and women of the family would be traditionally gathering right now to bake batches of Maamool. The aroma sneaks out of the oven to reach every sense of smell around and makes one desire to eat Maamool instantly. Hopefully this ritual will never go out of style, as it adds excitement to this beautiful occasion.

Maamool is very popular in Lebanon during Easter and I’ve been asked for the recipe hundreds of times. I hope you will love it as much as I do and appreciate the artist behind this elegant treat. I think who ever invented it, did care about each of his taste buds. Who would have thought about the mix of this fragrant dough coming from the combination of the rose water and the orange blossom water. The result is a delicious cookie that melts in your mouth and the pistachio filling gives it a soft chomp. Impressive!

Maamoul With Pistachios or Walnuts

For 30 pieces

Ingredients

Maamoul Dough

  • 3 cups coarse semolina (ferkha)
  • 2 cups fine semolina (smeed naim)
  • ½ cup of sugar
  • 3 sticks/300g of butter, melted (and let cool down) I use Lurpak blocks
  • 100ml of rose water
  • 30ml/2 tbsp of orange blossom water
  • ⅙ teaspoon instant yeast

Nut Filling

  • 200g of unsalted pistachio nuts or unsalted walnuts
  • ¾ cup of regular sugar
  • 2tbsp of rose water
  • 3tbsp of orange blossom water
  • Icing sugar to decorate

Preparation

  1. Mix coarse semolina, fine semolina and sugar together.
  2. Add yeast and melted butter and rub with hands until well combined.
  3. Gradually pour WARM orange blossom water and rose water, kneading the dough gently with hands. Place the dough in a large bowl and cover with a wet kitchen towel. Let it sit for 1 hour at room temperature.
  4. To make the filling, combine all ingredients.
  5. Divide the dough in 2. Scoop walnut size of maamoul dough and flatten it on the palm of your hand, fill it with pistachios or walnut filling and make a ball. Repeat this step until you finish the dough.
  6. Press gently each ball into a traditional “Maamoul” mold to take shape and tap out on the baking sheet to drop out of the mould. If the dough is sticky, lightly flour the mold.
  7. In a preheated oven 200C/400F bake the maamoul cookies for about 15-20mn or until the sides are slightly golden.
  8. Sprinkle with icing sugar, while still hot. Let cool down and sprinkle again until fully covered.

My Valentine Red Velvet Cake

Valentine Red Velvet Cake

Kids had few days off school as part of their winter break and instead of taking them to a ski vacation we flew to sunny Dubai and stayed at one of our favorite resort Atlantis the Palm, where kids had an amazing time on the beach with mommy (myself hihihi)  and friends. We’re lucky to have so many friends living in Dubai, which always makes of our vacation an unforgettable one.

Back to my kitchen and to my baking passion, an old recipe of a red velvet cake shouted at me across the room to urgently make it; I was so powerless over its lusciousness and didn’t hesitate for a second.

I usually prefer dry cakes without any frosting on, but this combination of red velvet cake and vanilla cream cheese frosting is gorgeous and I’m sure once you try it you will stay hooked.

I had fun writing words with my children to top each slice of the cake, we wrote much more than we needed as some of them got broken while peeling them off the paper, but no one minded eating an extra piece of chocolate, they clearly have a sweet tooth like mommy.

Red Velvet Cake

Ingredients:

  • ½ cup unsalted butter, at room temperature
  • 1 ½ cups sugar
  • 2 eggs, at room temperature
  • 1 tsp vanilla extract
  • 3 tbsp unsweetened cocoa powder
  • 3 tbsp red food coloring
  • 2 ½ cups all-purpose flour
  • 1 tbsp baking powder
  • ½ tsp salt
  • 1 cup milk, at room temperature
  • 1 tsp white vinegar
  • 1 tsp baking soda

For the cream cheese frosting

  • 450g / 16 oz. cream cheese, at room temperature
  • 3 tbsp butter, at room temperature
  • 1 tsp vanilla extract
  • 2½ cups icing sugar, sifted
  • Pinch of salt
  • 100g dark chocolate to make the toppers (optional)

Directions:

Preheat the oven to 185°C. Grease and flour two 9-inch round cake pan.

In a large bowl, using a hand mixer or a stand mixer, beat butter and sugar. Beat in eggs, one at a time. Beat in vanilla.

Mix together cocoa powder and food coloring to form a paste and add it to the egg mixture.

Sift together flour, salt and baking powder. Add the flour mixture, gradually to the egg mixture, alternating with the milk, beat until well incorporated, making sure to scrape down the bottom of the bowl with a spatula.

Mix baking soda and vinegar together and add.

Divide batter into prepared pans. Bake 30-40 minutes, until cake springs back when gently pressed with finger.

Cool the cakes in their pans on a wire rack for 10 minutes. Remove the cakes from the pan, and allow to cool completely before frosting.

To make the frosting: Whisk together cream cheese and butter until smooth.

Add, sugar, vanilla and salt and beat on medium-high speed until well combined.

To assemble, place one of the cakes top side-down on a cake stand or plate. Spread the cream cheese over the top. Top it with the second cake and now spread the remaining cream cheese to cover the cakes from all sides, and decorate if desired.

To make the toppers: Melt chocolate over a bain-marie and fill it in a squeeze bottle or a piping bag. Write words (like love, kisses, hugs, xoxo, valentine) on a wax paper and wait few minutes to cool. Once the chocolate is hard, peel it off the paper and insert it gently in the cream.

Chocolate Stout Cake

Photography Serge Oryan

Photography Serge Oryan www.sergeoryan.com

I don’t remember having a cake with beer inside until few months back when I was in New York City. My friend insisted that I try some, telling me that it doesn’t taste like beer at all. She was right it doesn’t taste the beer, but the stout inside adds a twist that calls you for a second bite and more. It’s moist, unlike you might be thinking it’s not bitter, but does have a deep tang.

I browsed few recipes online, all very similar. Most use sour cream, but I prefer the fresh organic yogurt I get straight from the farm. I used Almaza Lebanese beer, which I love, but you can use Guinness or your favorite dark beer.

I baked this same cake twice this week, and every single bite was a true dose of happiness!

Ingredients:

  • 100g / 1 stick butter, melted
  • 1 ½ cup dark beer
  • ½ cup milk
  • 3 eggs
  • 1 tsp vanilla
  • ½ cup plain Greek yogurt
  • 2 ½ cups all-purpose flour, sifted
  • 2 cups light brown sugar
  • ¾ cup unsweetened cocoa powder, sifted
  • 1 tsp baking soda
  • Pinch of Salt

Directions:

  1. Pre-heat the oven to 185°C. Grease and flour a cake pan.
  2. In a large bowl, using a hand mixer or a stand mixer, beat butter, beer, and milk. Beat in eggs, one at a time. Beat in vanilla. Add yogurt and mix until incorporated.
  3. In a large bowl, combine flour, sugar, cocoa powder, baking soda and salt.
  4. Fold the dry flour mixture, gradually in the wet beer mixture, making sure to scrape down the bowl with a spatula.
  5. Spoon batter into prepared pan. Bake 40-50 minutes, until cake springs back when gently pressed with finger.
  6. Let cool in pan on rack.

Makhlouta

Food Styling by Maya Oryan - Photography by Serge Oryan

Food Styling by Maya Oryan – Photography by Serge Oryan

Mornings are the worst when one is sick. I still have the cold and waking up in the morning with a persistent cough and a very dry throat.

My beloved husband came to bed this morning, with some freshly squeezed OJ and told me: “I cooked Makhlouta for the kids and you”.

I guessed he was cooking Makhlouta as I heard the pressure cooker whistling;-) It’s still awesome news, no! He knew I was too sick to enter the kitchen. How sweet of him!

I love how he didn’t say lunch or dinner, he said Makhlouta his favorite meal -and mine- on a cold winter day like today.

Makhlouta is a Lebanese traditional stew that means “mixed” because it consists of a mixture of pulses and beans. There’s no straight recipe, it can be any kind of 5 to 7 pulses and grains. Open your kitchen cabinet or check your pantry and take a handful of every grain you have there.

I grew in the heart of the city and my parents never cooked Makhlouta for us, while my husband grew in a Lebanese village called Baskinta situated at an altitude of 1250 meters above sea level. The winter in Baskinta is cold and snowy, so many dishes are pulses based and Makhlouta is a meal you can eat twice a week. Now that we are married, anytime I ask him what to cook, his answer would be anything with whole grains.

Makhlouta is loaded with fibers and protein, its simple ingredients makes of it a very easy vegetarian thick soup.

This recipe uses pinto beans, garbanzo beans, lentils, whole wheat, brown rice and cracked wheat but feel free to use any 5 to 6 variety of your choice like broad beans, white beans, red kidney bean. The most common is to use brown lentils, but this recipe uses a mix of 3 colors lentils as we had an organic mix in our pantry.

NOT ONLY HE COOKED FOR ME, BUT HE ALSO TOOK THIS BEAUTIFUL, MOUTH-WATERING PHOTO! SERGE YOU’RE A TREASURE!

Makhlouta

Ingredients

  • 2 tbsp vegetable oil
  • 1 large white onion, chopped
  • ¼ cup mixed 3 colors lentils, washed and drained
  • ¼ cup brown rice, washed and drained
  • ¼ cup Burghul or cracked wheat, washed and drained
  • ¼ cup whole wheat
  • 6 cups of water
  • 1 cup pinto beans, soaked in water overnight
  • 1 cup chickpeas (garbanzo beans), soaked in water overnight
  • 1 tbsp tomato paste
  • Salt to taste
  • Cumin (optional)
  • Extra virgin Olive oil, to drizzle

 Preparation

  1. Drain and rinse the beans and the chickpeas. Place it in a pressure cook, cover with water and let cook.
  2. In a separate pan, heat the oil and fry the onion until wilt and brown.
  3. Add lentils, rice, burghul, whole wheat and water and bring to a boil.
  4. Add the cooked beans and chickpeas, with their water, stir in tomato paste. Season with salt, and cumin if desired, and simmer until everything is tender.
  5. Before serving, drizzle with olive oil and enjoy.

Tip 1: If you’re not using a pressure cook, place the beans in a saucepan, cover with cold water, bring to the boil and simmer. Let it cook until tender; this might take a little over an hour, depends on how fresh are the dried beans.

Tip 2: While soaking the beans, you may rinse and change the water after a couple of hours, if you want. Use a lot of water as the beans will grow in size and volume.


Thai Coconut Soup with Shiitake Mushrooms and Noodles

MayaOryan-IMG_3894

It has been really cold outside the last couple of days; winter has definitely arrived, temperature has dropped, and the wind is whipping up rain, thunder and grey sky.

Since I have the cold, I feel that there’s nothing better than cocooning inside my home and cozying up to the fireplace while sipping home made hot chocolate or a hearty warm soup.

Being sick is not fun especially when your nose is so congested that all food seems tasteless. I was craving for spicy meals and intense flavors when this recipe came to my mind.

It was ready in no time mostly because I had all the ingredients available. I love this soup, it’s creamy, flavorful and easy to prepare. Add chicken and it will become a complete meal.

Enjoy!

Thai Coconut Soup with Shiitake Mushrooms and Noodles

Ingredients

  • 1 tbsp Vegetable Oil
  • 1 thumbed-size piece of fresh ginger, grated
  • 1 tbsp Thai red curry paste
  • 3 cups chicken stock
  • 1 tbsp fish sauce
  • 1 tbsp brown sugar
  • 1 can coconut milk
  • 1 carrot, sliced
  • ¼ cup green onions, sliced (green part only)
  • ½ cup shiitake mushrooms fresh or in a jar, sliced
  • 100g noodles
  • Juice of 1 fresh lime
  • Salt, to taste

Preparation

  1. Heat oil and cook ginger and curry paste for 1 minute.
  2. Add chicken stock, fish sauce, brown sugar and simmer for 10 minutes.
  3. Stir in the coconut milk, carrots, green onions and mushrooms and cook until the mushrooms are soft, about 5-7 minutes.
  4. Add noodles and cook for further 2 minutes. Stir in lime juice and season with salt. Serve hot.