Honey Almond Slices

Honey Akmond Slices - Blog

FRIENDS… and not the TV show! Friends that we have, from school, work, clubs… and friends we make through our children later in life. How many times while dropping your child at a new friend and when waiting for the door to open, you start wondering about the mom… Is she nice? Fun? Warm? Chatty? Psycho? Does she give a lot of sweets? And how many of them ended to be a keeper and became one of your closest friends. I am blessed with few of them, actually many, and we share a lot; we take trips together, we volunteer for school projects and we sometimes bake together.

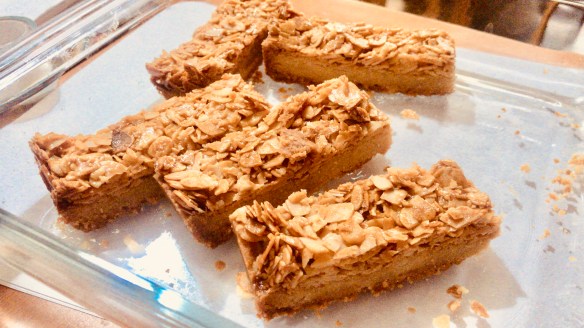
The Honey Almond Slices is a new recipe for me. Axel, my daughter, had tasted it at her friend’s house and at pick up time she begged me to bake some for her. The funny part is that the mom bought her bars at the market and doesn’t even know what it was called. Thanks God for Pinterest where I combined few recipes and made my own with less butter and less sugar but still I thank my friend for the inspiration. My eagerness is boundless to try new recipes, especially that belongs to the dessert section.

Ingredients

For the base:

  • 1 ½  cup all purpose flour
  • 1 cup ground almond
  • 1/2 cup light brown sugar
  • 120g butter, melted

For the topping:

  • 150g butter
  • ¼ cup brown sugar
  • ¼ cup honey
  • 2 cups sliced almonds

25 cm x 25 cm pan

Preparation

  1. To make the base Combine flour, ground almond, brown sugar and melted butter until you have a moist sandy mixture. Press mixture into a brownie mold or tart tin and bake for 12 minutes at 170°C / 335°F.
  2. To make the filling Inside a saucepan, on low-medium heat, place butter to melt, add sugar, honey and sliced almonds. Stir to well combine.
  3. Spread mixture to top evenly the base and return to oven to bake for 25 minutes or until deep golden brown.
  4. Allow to cool completely. Remove from pan and slice into squares or rectangles and serve.
Advertisement

Orange Pineapple Punch

maya-oryan-img_0461Hello beautiful people! Is it summer where you are? I spent my day running from one air-conditioned room to the other, trying to avoid the heat and humidity.

My kiddos spent the day at the pool with the cousins swimming and playing in the sun all afternoon, when they got back I couldn’t but surprise them with this cool refreshing orange pineapple punch.

Add some vodka inside and turn it into an adult party-wide hit punch!!

Decorate with strawberry slices and orange wedges, and serve.

Ingredients

  • 2 parts orange juice
  • 2 parts pineapple juice
  • ½ part lime juice
  • 2 tbsp honey
  • 2 parts 7up or Sprite
  • Fresh strawberries and orange wedges, to decorate.

Preparation

Combine well the orange juice, pineapple juice, lime juice and honey in a pitcher. Taste and adjust sweetness.

Add 7up or Sprite, right before serving and garnish with fresh fruits and paper straw.

P.S Substitute the sprite with rum or vodka for an adults party version

A Month to Celebrate

image

April is for me a month to celebrate; Kaia turns 11 and Axel turns 6 and my youngest baby Maya’s Ingredients turns 5!

Yes, Five years ago, my baby blog was born!!

Like any child, he needs attention, warmth and care. He kept me awake at night reading him stories. He made me wake up early answering his inquiries. He tested my photography skills and made me follow him with a camera. He became so popular that he made me famous:)

My baby blog has followers and friends from all around the world. He is established on the blogosphere and has a fine reputation.

To celebrate I prepared a giant bowl of fruit salad soaking in orange juice, just by adding a drizzle of honey and a handful of pine nuts, I made it taste like the best fruit salad ever.

No recipe directions to follow! Combine at least 4 to 5 varieties of your favorite fruits chopped. Add fresh orange juice. Drizzle some honey and decorate with raw pine nuts.

Enjoy it fresh and Happy anniversary to Maya’s Ingredients!

Honey Tahini Cookies -(feat.video tutorial)

IMG_5765

I always wanted to post one of my recipe videos but kept on postponing thinking that it might be boring; until today, I was watching this recipe with my little daughter when she told me “this looks super easy, lets make some straight away!”

Not only I was happy that it took her only once to watch the video and wanting to try the recipe out, but also I was encouraged to upload my video and not to be nervous anymore about it.

If you love Halawa (Halva) you will love these cookies. They are both crisp and chewy and totally easy to make. The combination of Tahini and honey tastes like Halawa and who wants to resist this flavor.

These cookies will be your new favorite!

Honey Tahini Cookies

Makes 30

Ingredients:

  • 1 stick / 100g butter, at room temperature
  • ¾ cup sugar
  • ½ cup tahini
  • 1 tbsp honey
  • 1 tbsp orange blossom water
  • 1 ½ cups all-purpose flour
  • 1 tsp baking soda
  • Pinch of salt

Directions:

  1. In a stand mixer, beat butter and sugar on medium-high until light and fluffy.
  2. Gradually add the tahini, honey and orange blossom water.
  3. In a medium size bowl, whisk flour, baking soda and salt together. Reduce the mixer speed to low and slowly add the flour to tahini mixture, combining well until forming a dough.
  4. Chill in the refrigerator for about an hour.
  5. Preheat oven to 170°C or 350°
  6. Line baking sheets with parchment paper. Using your hands, take a walnut size of dough and shape into balls. Arrange them on the cookie sheet at least 2 inches / 5cm apart. Dip the tines of a fork in flour and gently press a crisscross pattern into each ball. Dip fork in flour after every cookie to avoid sticking.
  7. Bake in the middle rack of the oven for 13-15 minutes or until the cookies begin to show cracks.

Chef Emile’s Vegetable Salad

IMG_4430MayaOryan

Last year, my daughter’s class, Grade III, at school had to present POLAND on International Day. I, of course, offered my help to cook Polish food to be presented at our stall. Some moms signed in their name in my group before I even announce myself as a contributor. Thank you for your trust;-)

Well my menu and especially the salad, turned out to be a hit as people kept on coming back for more.

I thought the best is to serve something cold like salad and cake, as it’s going to be a lot of people coming at the same time for tasting after the dancing show. There were 1200 visitors and maybe 12 stalls. Salatka Jarzynowa is a traditional Polish salad that is served during holidays. It is prepared with root vegetables like carrot, potatoes and celery root. This salad is best prepared one day before as it needs to mature and tastes really better the next day. This was really convenient as part of the savory menu.

The best version to make it is my dad’s recipe; I did mention that my dad was a chef and I sure learnt from him a lot of cooking. His recipe has always been a star dish! It’s so consistent that we can eat this alone. I remember how he decorates it with shrimps or cold cuts, and always place it side by side with the turkey on Christmas. This year’s dinner was at my sister, and dad showed up with THE SALAD and they were both more than welcome.

Emile’s 2 important tips are: to prepare the vegetable salad with only vegetables that are not juicy, and to never skip the honey in the dressing.

I hate when one’s look at this salad and tells me I don’t eat potato salad, am like it’s okay to venture once, it’s not only potato … my genius dad taught me how to add Emmenthal cheese, ham and apple and this is the tastier salad you can ever eat!

My last request, please don’t open cans and throw in this salad, it only tastes better when you make it with fresh ingredients. How long does it take to chop little vegetables and let it boil for 10 minutes.

I really hope you enjoy this recipe and consider making it during holiday celebrations. As I said, it is best to prepare one day before serving.

For a fancier look, store it in a round container in the fridge, and just before serving, turn it upside down on a flat round plate and decorate with salami, cheese, salmon or shrimps.

Ingredients

  • 2 cups fresh potatoes, diced and cooked al dente
  • 1 cup fresh carrots, diced and cooked al dente
  • 1 cup fresh (or frozen) peas, cooked
  • 200g Emmenthal cheese, diced
  • 200g Ham or turkey ham/ slices of ½ inch thick, diced
  • 200g Granny Smith apples, diced
  • 2 tbsp gherkins pickles, sliced (optional)

Dressing:

  • 4 tbsp mayonnaise
  • 2 tbsp ketchup
  • 1 tbsp Dijon mustard
  • 1 tsp honey
  • Pinch of salt

Preparation

  1. To cook the potatoes, boil water and cook potatoes 7-10 minutes until cooked but still hard.
  2. Cook carrots and peas same as potatoes, and each one separately. Please don’t cook all together in same pot because the time of boiling varies for each one.
  3. Set aside to cool.
  4. Combine cheese, apples and pickles. Add to potatoes, carrots and peas.
  5. Mix all the ingredients of the dressing and toss in the salad. Combine well gently. I use a rubber spatula not to mash the vegetables. Refrigerate.