Three different kind of Kale: Curly, Tuscan, and Russian Red Kale!

10 years before I had never heard of Kale, and when I first tasted it I don’t really remember falling for it. Next I hear, it’s becoming an official trend, consumed ravenously and featured on every glamorous salad carte du jour or stylish smoothie menu.

Kale belongs to the group of wild cabbage, their leaves are edible and range in color from light green to dark green with a trace of blue or purple. It grows in a loose bouquet of leaves without forming a head in the center.

Kale are known to like dry, olive oil, or lemon juice hand massages; this quick process helps breaking up the cellulose structure, in a way to get a slightly sweeter and milder taste.

Like quinoa, because of its health value, it became wildly popular. Consuming Kale may help boost your digestive system. It contains a wide range of nutrients like calcium, vitamins A, K and C, fiber, antioxidants, and iron. It is available in different types.
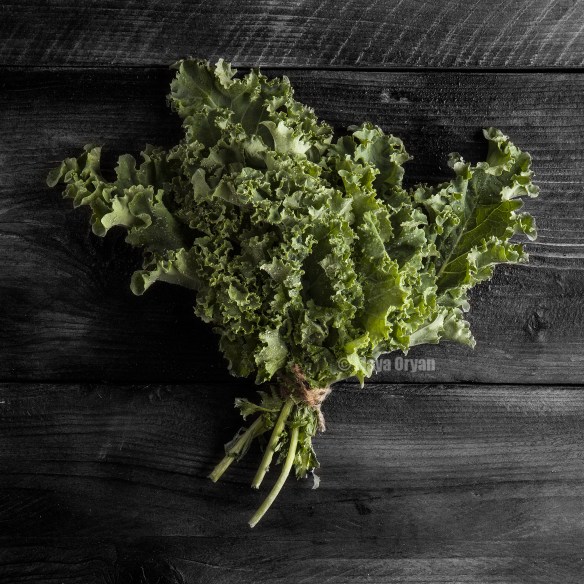
Curly Kale-Blog

  1. Curly-leaf Kale

This is the most common type. They tend to have a distinct peppery flavor. The leaves are so crinkly and tight. The best way to chop them is to separate the leaves from the stalk first, next lay the leaf upside down on the chopping board and using a knife cut following the stalk down along both sides. The stalks are fibrous and hard, if you prefer not to discard them, they can be used to make stews or stocks.

Russian Kale-Blog

  1. Russian Red Kale

Russian red kale has dark green fringed leaves and red stems. They somehow resemble to oak leaves. The tips of the leaves are tender and sweet with a slight edge of nuttiness making it a good ingredient for raw dishes. They are juicy but not tender, the stems are thick and fibrous to consume same like Tuscan and curly kale. This gourmet variety will add lavish touch to your menu.

Italian Kale-Blog

  1. Baby Tuscan Kale

Tuscan Kale is better known by Italian as “cavolo nero” translated to English as black cabbage and often used in the Tuscan soup “ribollita”. Other names include dinosaur kale because its leaves resemble to dinosaur skin! It’s different than the curly kale because of its dark green color, smooth tender texture and mild flavor. It’s actually this type of Kale that changed me from a kale-hater candidate to a living-by-it one! It doesn’t taste bitter and has a deep nutty sweetness that I relish in my salads. Above picture features baby leaves, but it comes in bigger leaves as well.

Fried Caulifower and Tahini Dip

Fried Cauliflower

Nothing can beat this amazing vegetarian appetizer! Served as a snack or as a side dish, it’s crisp, tasty and easy to make. The homemade tahini dip a.k.a tarator is the perfect accompaniment to this straight forward recipe. Enjoy!

Ingredients

  • 1 kg cauliflower, cut into florets
  • Vegetable Oil for frying

For the Dip

  • ½ cup tahini (tahina or sesame paste)
  • 3 tbsp fresh lemon juice
  • 3 tbsp water
  • Pinch of salt

Preparation

  1. Bring a large saucepan of salted water to boil, and blanch the cauliflower for 8-10 minutes. Remove from water. Drain and set aside.
  2. Heat the oil in a frying pan over medium-high heat. Place the cauliflower in and fry for 5-6 minutes or until it turns golden brown. Transfer to a plate lined with wax paper or paper towel to drain.
  3. To make the dip, combine tahini, lemon juice, water and salt. Stir until well combined. Taste and adjust seasoning to liking.
  4. Serve cauliflower and dip as an appetizer.

P.S. Can also be served in pita bread as a sandwich.

White Beans Salad

White Beans Salad

Hello World! Isn’t it a beautiful day or is it just me! Kids are at school, which makes it much easier for me to concentrate on blogging and to stare at my screen and finish typing one whole sentence without being interrupted.

As much as I look forward for the school bus arrival in the afternoon, I SOMETIMES look forward for its departure the next morning. I must sound like a terrible mom, but it’s only when they’re at school that I enjoy my time guiltlessly! I can sense a lot of like-mindedness here, yes?

I can train 2 hours at the gym instead of 1, and when I go with Serge, I know that in between the reps we can leisurely chat, make plans or even exchange stories about Kaia and Axel.

Yesterday’s main topic was “beans”! Since meat is not right up my alley, Serge makes always sure that I’m at least having my share of pulses instead.

It’s kind of obvious, with so many healthy recipes on my blog, that I love healthy food, such as beans. They are very popular in my kitchen especially around this season with every grocer I visit, displaying elegantly his Aysha Khanum beans boxes. As the summer comes to a close, Aysha Khanum or shell beans (a.k.a Cranberry beans) are harvested. Beans inside the pods are now ready and plump. One variety is white while the other is white and blotched with red color; for the record, those red spots disappear once the beans are cooked.

During the last days of summer, I buy a lot of fresh shell beans, divide them in portions and freeze them for winter. It’s so easy to do; the pods open right up, releasing four to five beans each, I place all uncooked in freezer bags. The advantage is that they cook much faster than dry beans and taste much better.

My kids favorite white bean recipe is Fassolia bi Lahme, kind of a bean stew cooked with red sauce, meat chunks and served with rice on the side. I prefer the white bean salad, that probably you don’t need a recipe to make it, but I couldn’t help but share, especially after gazing at this gorgeous photo that I enjoyed styling while Serge was setting his camera and lightings. While on the surface this dish seems so simple in reality delivers some serious flavor!

P.S My Instagram account is @oryanmaya

White Beans Salad

Ingredients:

  • 2 cups / 450g white or cranberry beans
  • or 1 can 450g of cooked white beans (washed and drained)
  • ½ cup extra virgin olive oil
  • ¼ cup lemon juice
  • 1 crushed clove of garlic (optional)
  • Salt, to taste
  • Fresh chopped parsley, to garnish

Preparation:

If using fresh shell beans, place them in a pressure cooker and cover with water (the water should come 1 to 1½ inch above the beans level). Cover and lock the lid. Let it cook over high heat for 15 minutes. Reduce the heat to low and cook for further 10-15 minutes. Release the pressure and wait for the cooker to cool entirely. Open carefully and drain. Alternatively use regular saucepan, cover with water and cook until beans are soft and tender.

If using dry beans, soak overnight and cook as per previous instructions inside a pressure cook, but for about 50-60 minutes.

In a small bowl, combine olive oil, lemon juice, garlic, salt and drizzle over the beans. You can adjust the dressing to taste.

Garnish with parsley and serve with Lebanese pita bread and spring onions.

Panzanella (Italian Bread Salad)

IMG_4570MayaOryan

Panzanella salad is one that I remember to prepare when I have a slightly stale French loaf. I love home-made croutons, and when flavored with garlic or cheese I can nibble at that all day long.

This salad uses simple ingredients, like tomatoes, red onions, basil and a couple of cucumbers to add some crunch. The sharp taste of the dressing is a good match and will appreciatively contrast with the croutons.

Don’t forget to pull out your best quality extra-virgin olive to make it!


Panzanella (Italian Bread Salad)

Ingredients:

  • ½ cup extra virgin oil
  • 3 garlic cloves
  • 1 day old, loaf French baguette or Italian bread, cut in croutons size
  • 4 tomatoes, diced
  • 2 cucumbers, diced
  • 1 small red onion, chopped
  • ¼ cup basil leaves, chopped

Dressing

  • 2 tbsp red wine vinegar (or apple vinegar)
  • 1 tbsp minced shallot
  • Pinch of sugar
  • Salt, to taste

Directions:


  1. Preheat oven to 170 degrees Celsius.
  2. Heat olive oil for 2 minutes, then drop the garlic inside and leave it to cool.
  3. Scatter the bread pieces on a baking tray and brush or drizzle with 2 tablespoons of the garlic olive oil. Place the baking tray in the middle of the oven and bake about 5-7 minutes on each side.
  4. Remove from oven and sprinkle with salt.
  5. To prepare the dressing; discard garlic cloves. Add vinegar, shallot sugar and salt to olive oil and whisk.
  6. In a large bowl, combine the tomatoes, cucumber, red onion, basil and bread (croutons). Toss all in the dressing and serve immediately.

Two-Potato Gratin

Two-Potato Gratin IMG_4645

Hello storm, you’re wild and angry, violent and reckless and I don’t seem to like you! I’m nothing like ready for cold obviously; a powerful storm with violent winds and heavy hail and rainfall is ripping through Lebanon leaving me with limited desire to step out.

Meantime schools are shut and my daughters are, with all the kids of the neighborhood, celebrating the happy occasion. My doorbell kept on ringing, kids in kids out, …well if I look at it from the bright side, it was a good exercise for me especially that I skipped gym this morning;-)

So it was almost lunchtime and I still haven’t decided on what to cook! I went roaming in the kitchen when my sight fell on potatoes. Since I didn’t have enough of gold potatoes to make a large dish of gratin enough for guests and us, I added sweet potatoes! Results were gorgeous and crunchy. Yummm!

I have decided to eat more vegetarian food during January and I proudly add this recipe to my meat-free repertoire. I added a dash of curry to it while the cream was simmering and some parmesan cheese on the top before baking, that I don’t mention in below recipe, but now that I reveal it you may want to try it with curry or even chili for some spicy flavor.

Two-Potato Gratin 

Ingredients

  • 2 kg potatoes (half sweet potatoes and half gold), sliced
  • 1 tbsp butter
  • 1 cup cream
  • 1 tsp salt
  • Pinch of pepper
  • Pinch of nutmeg
  • 1 tbsp olive oil
  • ½ cup cheddar cheese
  • ½ cup Emmenthal cheese

Preparation

  1. Pre-heat the oven to 200°C/400°F/gas 6. Butter a shallow ceramic baking dish.
  2. Pour the cream in a large saucepan, add salt, pepper, nutmeg and heat to boiling over medium-high heat. Add potatoes and drizzle with olive oil and let simmer for 3-4 minutes.
  3. Remove pan from the heat. Use a slotted spoon to transfer half of the potatoes, layer them and sprinkle with cheddar cheese. Top with the remaining potatoes; pour the cream mixture and sprinkle with the Emmenthal cheese.
  4. Bake for 40-45 minutes until gorgeous and golden on the top.

Makhlouta

Food Styling by Maya Oryan - Photography by Serge Oryan

Food Styling by Maya Oryan – Photography by Serge Oryan

Mornings are the worst when one is sick. I still have the cold and waking up in the morning with a persistent cough and a very dry throat.

My beloved husband came to bed this morning, with some freshly squeezed OJ and told me: “I cooked Makhlouta for the kids and you”.

I guessed he was cooking Makhlouta as I heard the pressure cooker whistling;-) It’s still awesome news, no! He knew I was too sick to enter the kitchen. How sweet of him!

I love how he didn’t say lunch or dinner, he said Makhlouta his favorite meal -and mine- on a cold winter day like today.

Makhlouta is a Lebanese traditional stew that means “mixed” because it consists of a mixture of pulses and beans. There’s no straight recipe, it can be any kind of 5 to 7 pulses and grains. Open your kitchen cabinet or check your pantry and take a handful of every grain you have there.

I grew in the heart of the city and my parents never cooked Makhlouta for us, while my husband grew in a Lebanese village called Baskinta situated at an altitude of 1250 meters above sea level. The winter in Baskinta is cold and snowy, so many dishes are pulses based and Makhlouta is a meal you can eat twice a week. Now that we are married, anytime I ask him what to cook, his answer would be anything with whole grains.

Makhlouta is loaded with fibers and protein, its simple ingredients makes of it a very easy vegetarian thick soup.

This recipe uses pinto beans, garbanzo beans, lentils, whole wheat, brown rice and cracked wheat but feel free to use any 5 to 6 variety of your choice like broad beans, white beans, red kidney bean. The most common is to use brown lentils, but this recipe uses a mix of 3 colors lentils as we had an organic mix in our pantry.

NOT ONLY HE COOKED FOR ME, BUT HE ALSO TOOK THIS BEAUTIFUL, MOUTH-WATERING PHOTO! SERGE YOU’RE A TREASURE!

Makhlouta

Ingredients

  • 2 tbsp vegetable oil
  • 1 large white onion, chopped
  • ¼ cup mixed 3 colors lentils, washed and drained
  • ¼ cup brown rice, washed and drained
  • ¼ cup Burghul or cracked wheat, washed and drained
  • ¼ cup whole wheat
  • 6 cups of water
  • 1 cup pinto beans, soaked in water overnight
  • 1 cup chickpeas (garbanzo beans), soaked in water overnight
  • 1 tbsp tomato paste
  • Salt to taste
  • Cumin (optional)
  • Extra virgin Olive oil, to drizzle

 Preparation

  1. Drain and rinse the beans and the chickpeas. Place it in a pressure cook, cover with water and let cook.
  2. In a separate pan, heat the oil and fry the onion until wilt and brown.
  3. Add lentils, rice, burghul, whole wheat and water and bring to a boil.
  4. Add the cooked beans and chickpeas, with their water, stir in tomato paste. Season with salt, and cumin if desired, and simmer until everything is tender.
  5. Before serving, drizzle with olive oil and enjoy.

Tip 1: If you’re not using a pressure cook, place the beans in a saucepan, cover with cold water, bring to the boil and simmer. Let it cook until tender; this might take a little over an hour, depends on how fresh are the dried beans.

Tip 2: While soaking the beans, you may rinse and change the water after a couple of hours, if you want. Use a lot of water as the beans will grow in size and volume.


Chicory salad – Hindbeh bi Zeit

MayaOryan-Hindbeh Bi Zeit

Lebanese meze is rich in vegetarian dishes. It is an array of sampling size dishes, mostly falling into the same “healthy” bracket, as most recipes contain vegetables, nuts, olive oil, fresh herbs and seeds.

The most popular dish is hummus, but there are also fattoosh, tabouleh, baba ghanouj, fateh, falafel, shankleesh, fatayer silik, Loubieh bi Zeit and many more. So if you prefer vegetables over meat, it’s definitely worth visiting a Lebanese restaurant where vegetarian dishes are served in abundance.

Hindbeh bi zeit is one typical example of salad also falling in the meze category and using simple fresh ingredients. It can be quickly prepared at home. If you can’t find chicory in your region try to look for dandelions, both will result a light and simple salad, tangy with lemon juice and garnished with crisp onions.

Chicory salad – Hindbeh bi Zeit

Serves 4 – Preparation Time 20 minutes – Cooking Time 25 minutes

Ingredients

  • 1 bunch of fresh green chicory, washed and chopped coarsely
  • 2 tbsp vegetable oil
  • 1 cup onions, sliced
  • 1 tsp salt
  • 4 tbsp lemon juice
  • Olive oil, to taste

Preparation

  1. In a large pot, heat oil and add onions to fry. Let cook until golden. Reserve some for garnishing.
  2. Add the chicory and mix until well incorporated.
  3. Season with salt. Let cook, on low heat, for about 10 minutes.
  4. Turn off the heat and drizzle with lemon juice.
  5. Serve at room temperature with olive oil and lemon wedges.

Another variation of the recipe  you can add sugar while frying the onions or make caramelized onions instead. You will love this salad with toasted pine nuts as well; sprinkle a handful at the end of your preparation.

Kibbet La’teen or Pumpkin Kibbeh Balls

KibbehMayaOryanDubai is calling me again and I have to travel next weekend. My trips are getting closer with time and I’m kind of used to it now, it’s in the system!

It’s actually in the entire family’s system (laughing). My mom offers her baby-sitting services before she accepts any invitation from her friends. My husband waits until I come back to travel so we don’t both leave the kids at the same time. My sisters cook always a little bit more to send it to us and my daughters have always a wish list of gifts ready for me to get them when I travel. I’m so blessed!

Thank you all for your support and for understanding how much I love what I do.

Well, everybody knows that when I’m not styling food, I’m still very busy doing everything else. I’m much more productive than every woman I know who has no job. I don’t know if it’s my energy that keeps me on the go, or simply the guilt feeling that I’ve been away from my family to work and I have to make it up for them. I exercise every day. I cook two meals (stirring in one hand and whatsApp-ing with the other). I tend to be the perfect wife, the fit mom, the present friend and the career woman.

My friend says it’s my adrenaline, I simply think I’m well organized.

It requires nothing but good planning (and love life). I don’t want one day to look back and realize that I wasted my life only dreaming.

Those beautiful pumpkin kibbeh balls are a dream coming true. Well I’d be cheating on you if I say I made them, because my mother-in-law did. And as long as she is sending it to us regularly I doubt that I will try it any soon;-)

Pumpkin kibbeh balls are more popular during Lent and among vegetarians. For those of you who’d like to adventure in the kitchen, making this recipe, it’s somehow long but worth every effort.

Ingredients

Stuffing

  • 2 tbsp frying oil
  • 1 onion, sliced
  • 3 cups Swiss chard, chopped
  • ½ cup chick peas
  • 200g chopped walnuts
  • 50g toasted pine nuts
  • 1 tsp salt
  • 1 tsp sumac
  • 2 tbsp lemon juice
  • ½ tsp ground cumin (optional)

Meatballs (kibbeh)

  • ½ kg fresh pumpkin, boiled, pureed and drained in a sieve for 10 hours.
  • 1 onion, minced in a processor
  • 80g bulgur wheat
  • 2 tbsp plain flour
  • 1tsp salt
  • 1 tsp all spice
  • 1 tsp dried basil

Preparation

  1. In a heavy-bottomed saucepan, sauté the onion until brown and soft. Add Swiss chard, chickpeas, walnut and pine nuts and fry. Turn off the heat, add seasoning, lemon juice and set aside.
  2. Process onion, pumpkin purée and bulgur wheat. Add seasoning and flour, mix and let it cool in the fridge for at least 1 hour. If mixture is too hard add few drops of water.
  3. Moisten your hands and form kibbeh mixture into egg-size balls. With your index finger, make a hole on one end of the oval ball and spoon one tablespoon of filling inside and pinch the end to seal.
  4. Fry the kibbeh in cooking oil in batches or if desired, roast it in oven for about 25mn.
  5. Place the kibbeh on a serving dish and serve with cucumber yogurt salad.

Raheb Salad or Grilled Eggplant Salad

BatenjenRaheb

My husband has been away for the past 10 days, so little action since he’s gone. Taking it easy, sleeping more, working out more, (cooking less), playing with the kids and drawing together, volunteering for school where I can see my girls in class and all the things I love and I miss doing.

Next week is going to be a busy week for me more photo shoots and more food styling.

LIVE Broadcasting from the gym, writing this post after my 5km run and feeling proud!

I present you “Batenjein Raheb”!  A vegetarian Lebanese dish, made of grilled eggplant mixed with olive oil and lemon juice, seasoned with salt and topped with fresh parsley, tomatoes, cucumber and pepper.

I don’t remember when did I shot this picture with Serge but am happy to find it because it’s one of my favorite salads especially during Lent, which is starting on Monday.

I love this time of the year, a time of prayer and reflection for many, and a period when people are closer to God. During their fast they abstain from eating meat and vegetarian meals come more in fashion. The Raheb salad for me is easily a main course especially when eaten with bread. I sure prefer to grill my eggplants at home and eat them fresh, but for those who have little time in the kitchen, grilled eggplants come also in jars and are very tasty.

Raheb Salad or Grilled Eggplant Salad

Ingredients

  • 1 kg eggplant
  • ½ cup Olive oil
  • ½ cup Lemon juice
  • Salt, to taste
  • 2 tomatoes, diced
  • 2 cucumbers, diced
  • 2 bell peppers, diced
  • ½ cup parsley, chopped

Preparation

1.Pierce the eggplant with a fork, cover with foil and char grill over the stove burner on all sides. This will take around 15-20 minutes pending on how large is the eggplant. Alternatively, it can be grilled inside the oven on a baking tray for about 30 minutes.

2.Remove from heat and allow to cool.

3.Peel and scoop out the grilled pulp and discard charred skin. The pulp can be sieved to reduce the water.

4.Place the pulp in a bowl and mix with olive oil, lemon juice and salt.

5.Layer with peppers, cucumbers, tomatoes and parsley and serve.