Fried Caulifower and Tahini Dip

Fried Cauliflower

Nothing can beat this amazing vegetarian appetizer! Served as a snack or as a side dish, it’s crisp, tasty and easy to make. The homemade tahini dip a.k.a tarator is the perfect accompaniment to this straight forward recipe. Enjoy!

Ingredients

  • 1 kg cauliflower, cut into florets
  • Vegetable Oil for frying

For the Dip

  • ½ cup tahini (tahina or sesame paste)
  • 3 tbsp fresh lemon juice
  • 3 tbsp water
  • Pinch of salt

Preparation

  1. Bring a large saucepan of salted water to boil, and blanch the cauliflower for 8-10 minutes. Remove from water. Drain and set aside.
  2. Heat the oil in a frying pan over medium-high heat. Place the cauliflower in and fry for 5-6 minutes or until it turns golden brown. Transfer to a plate lined with wax paper or paper towel to drain.
  3. To make the dip, combine tahini, lemon juice, water and salt. Stir until well combined. Taste and adjust seasoning to liking.
  4. Serve cauliflower and dip as an appetizer.

P.S. Can also be served in pita bread as a sandwich.

Tenderloin Strips Easy Version

Beef Tenderloin-MayaOryan

I learned this recipe from my sister Hala. She has a whole repertoire of delicious recipes that can be ready in half an hour. She, like many working women has little time to spend in the kitchen and big concern about giving her family the right healthy food.

When she first gave it to me, I thought it was too simple to be good, but it turned out to be one of the juiciest and most flavored beef strips recipe, I cook.

It’s a family meal! When it’s on the menu: NO complains, everyone is eating happily. I usually add carrots to the mushrooms, too bad this time I didn’t, they would have added some color to the photo. When I was cooking this morning, I had no intentions to take pictures, I decided only when I saw the kids’ friends eating and asking for a second serving. Then I said: “Let’s shoot and share!”

This recipe can be done with rice or mashed potatoes, it can also be prepared as a festive dish, trust me, your guests are going to love it.

Tenderloin Strips Easy Version

Ingredients:

  • 1kg beef tenderloin, cut into strips
  • 1 onion
  • 1 garlic clove
  • 200g mushrooms, sliced
  • ¾ cup Ketchup
  • ¾ cup olive oil
  • ¾ cup soy sauce
  • ¼ tsp salt
  • ¼ tsp pepper
  • 1 tbsp butter
  • 2 cups basmati rice

Preparation:

Marinate in the refrigerator, beef strips with ketchup sauce, soy sauce and olive oil, overnight.

Melt the butter in a large heavy bottomed pot and add the onions and the garlic. Sauté for few minutes or until the onion starts to wilt and the garlic starts to turn golden.

Add the meat in batches and cook for 2-3 minutes or until it starts to brown on all sides, add the marinade, season with salt and pepper and let it simmer, with the lid on, until the meat is tender and the liquid is reduced and reaches a thick consistency.

Finally, add the mushrooms and let it simmer on medium heat for about 5 minutes.

Cook the rice according to package instructions and serve hot with beef strips.

Note: Since the marinade has a big amount of soy sauce, which is high in sodium, better not to add too much salt.

Yellow and Red Cherry Tomatoes Caprese Salad


1.Yellow and Red Cherry Tomatoes Caprese Salad

Photography Serge Oryan

The beauty of Italy never ceases to amaze me, from north to south, armed with many authentic places (and recipes!!!) I fall in love with each city I visit. I was in Rome this month for my Birthday. My precious husband treated me with a 5-stars vacation and spent his time spoiling me.

What fall under the culinary section during my trip, are lots of Parmesan cheese, seafood and sparkling wine. From casual street food to Michelin starred restaurants, Italian cuisine is as influential as Rome’s artistic and historical assets. I selected only a couple of places to talk about, the ones I really want to visit again upon my next trip.

The first night we had dinner at Rinaldi al Quirinale, 11 via Parma, the next day we came back for their orange marinated salmon, Salmone Marinato all’Arancio; the best I ever had! On the way to Rinaldi, at the southern end of via Nazionale, my husband couldn’t resist the fab’ smell of the fresh and crunchy fries at Queens Chips. He ordered a piccolo (small) size, which was really a massive portion of freshly fried chips and sauce for €2.50!

Rome2015

After a long shopping day around the Spanish steps I was in the mood for some Italian cheese, fresh smoothie and a hearty salad. Ginger restaurant, via Borgognona 43/44, was the best place for that. The menu is a compilation of gourmet treats, well presented in a white, modern and trendy environment. They serve light meals, fresh salads and sandwiches. Not only I enjoyed my cheese selection with a refreshing Caienna smoothie (Avocado, dates, banana, almond milk) and a Fossa salad (Mixed salad leaves, yellow and red lettuce, rocket, spinach, dried tomatoes, turkey, goat cheese, organic walnuts, green apple), but I also got to meet and chat with the talented Soprano Zeina Barhoum, who happened to be sitting right next to us.

On our way back from the Colosseum we stopped by Aroma restaurant where we booked a table for lunch. This gourmet restaurant has been awarded with 1 Michelin star and its regional cuisine has been recognized with 5 Star Diamond Award! It offers a spectacular view on the Colosseum, highly recommended for a special event (like my birthday!!). The food was exquisite and creative and the attentive staff follows the chef’s dedication. This dining experience was so momentous and exceeded our expectations.

The Aroma2

ZAroma

On the last eve, I went to a gourmet store and bought fresh mini mozzarella balls, as I was dreaming about Caprese salad. My recipe is so simple and totally relies on the freshness of the ingredients. It requires no slicing at all. Combine all ingredients and toss with best quality olive oil. There’s absolutely no excuse for using average olive oil in your salad. The key to a perfect Caprese salad is to use only the good stuff. Don’t add pesto or balsamic vinegar; the less improvement you do, the better. The recipe is a classic as it is, do yourself a favor and don’t try to ameliorate it. It doesn’t matter what kind of tomatoes you use as long as it’s fresh! I love to use yellow and red tomatoes, as this slight twist adds elegance to the presentation also the sweetness of the yellow tomato rounds off the creaminess of the mozarella. Enjoy!

Yellow and Red Cherry Tomatoes Caprese Salad

Ingredients

  • 100 g red cherry tomatoes, washed and rinsed
  • 100 g yellow cherry tomatoes, washed and rinsed
  • 150 g mini Mozzarella Cheese balls
  • A handful of fresh basil leaves
  • Dried oregano, to taste
  • Extra virgin Olive Oil, to taste
  • Coarse Sea Salt, to taste

Preparation

Combine tomatoes and Mozzarella balls. Sprinkle with basil leaves, oregano and salt. Drizzle with extra virgin olive oil.

Serve with Italian grissini or some crusty bread.

White Beans Salad

White Beans Salad

Hello World! Isn’t it a beautiful day or is it just me! Kids are at school, which makes it much easier for me to concentrate on blogging and to stare at my screen and finish typing one whole sentence without being interrupted.

As much as I look forward for the school bus arrival in the afternoon, I SOMETIMES look forward for its departure the next morning. I must sound like a terrible mom, but it’s only when they’re at school that I enjoy my time guiltlessly! I can sense a lot of like-mindedness here, yes?

I can train 2 hours at the gym instead of 1, and when I go with Serge, I know that in between the reps we can leisurely chat, make plans or even exchange stories about Kaia and Axel.

Yesterday’s main topic was “beans”! Since meat is not right up my alley, Serge makes always sure that I’m at least having my share of pulses instead.

It’s kind of obvious, with so many healthy recipes on my blog, that I love healthy food, such as beans. They are very popular in my kitchen especially around this season with every grocer I visit, displaying elegantly his Aysha Khanum beans boxes. As the summer comes to a close, Aysha Khanum or shell beans (a.k.a Cranberry beans) are harvested. Beans inside the pods are now ready and plump. One variety is white while the other is white and blotched with red color; for the record, those red spots disappear once the beans are cooked.

During the last days of summer, I buy a lot of fresh shell beans, divide them in portions and freeze them for winter. It’s so easy to do; the pods open right up, releasing four to five beans each, I place all uncooked in freezer bags. The advantage is that they cook much faster than dry beans and taste much better.

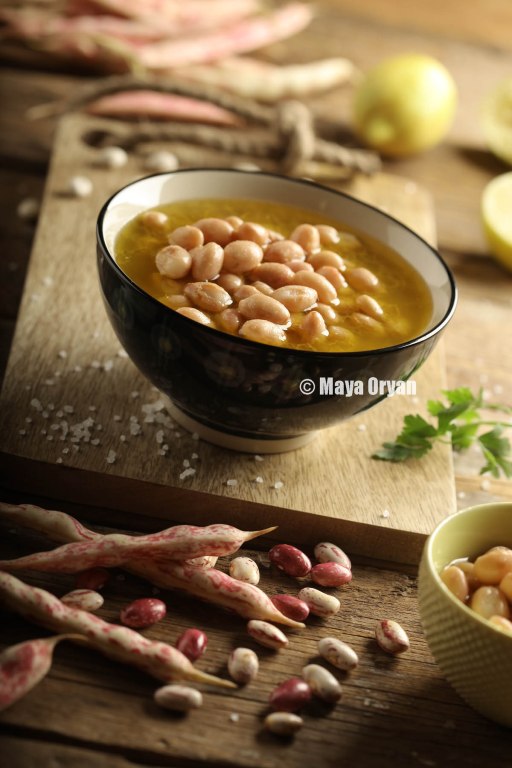
My kids favorite white bean recipe is Fassolia bi Lahme, kind of a bean stew cooked with red sauce, meat chunks and served with rice on the side. I prefer the white bean salad, that probably you don’t need a recipe to make it, but I couldn’t help but share, especially after gazing at this gorgeous photo that I enjoyed styling while Serge was setting his camera and lightings. While on the surface this dish seems so simple in reality delivers some serious flavor!

P.S My Instagram account is @oryanmaya

White Beans Salad

Ingredients:

  • 2 cups / 450g white or cranberry beans
  • or 1 can 450g of cooked white beans (washed and drained)
  • ½ cup extra virgin olive oil
  • ¼ cup lemon juice
  • 1 crushed clove of garlic (optional)
  • Salt, to taste
  • Fresh chopped parsley, to garnish

Preparation:

If using fresh shell beans, place them in a pressure cooker and cover with water (the water should come 1 to 1½ inch above the beans level). Cover and lock the lid. Let it cook over high heat for 15 minutes. Reduce the heat to low and cook for further 10-15 minutes. Release the pressure and wait for the cooker to cool entirely. Open carefully and drain. Alternatively use regular saucepan, cover with water and cook until beans are soft and tender.

If using dry beans, soak overnight and cook as per previous instructions inside a pressure cook, but for about 50-60 minutes.

In a small bowl, combine olive oil, lemon juice, garlic, salt and drizzle over the beans. You can adjust the dressing to taste.

Garnish with parsley and serve with Lebanese pita bread and spring onions.

Maya’s Ingredients 4th Anniversary

MocchaDrinkbyMayaOryan Four years ago I started a blog thinking that this will be a great idea to document all my favorite recipes and have them all in one location. This idea developed since tremendously and instead of a cooking book, I ended up with an address book filled with contacts of friends from all over the world. I’m blessed to have so many followers and so many clients interested in my cooking and work as a food stylist. It’s this Blog that took me this far! I had people assisting me on shoots just because they know “Maya’s Ingredients”, I met fresh graduated photography students who knows my name because I was introduced to them as part of their course at college and I was invited to speak about Food Styling and Food Blogging at several events and TV shows because my Blog and website made it so easy for every one to find me and view my work. I’m thrilled, …no overwhelmed:) I’m happy and I will have a toast to you, thank you for passing by and hope to see you often. This elegant drink can be put together in 3 quick steps. Serve it in martini glasses or shot glasses and say CHEERS!

Vanilla Vodka – Espresso Drink Ingredients

  • 1 cup Vanilla Vodka
  • ½ cup Cold espresso
  • ¼ cup Tia Maria
  • Wedge of Orange
  • 1 tbsp cocoa
  • Pinch of cayenne

Preparation Combine vodka, espresso and Tia Maria liquor into a shaker filled with ice and shake well. To serve, rub the rim of a martini glass with an orange wedge and dip into the cocoa cayenne mixture. Pour drink inside and enjoy. Cheers!

Black Treacle Cake

Photography Serge Oryan

Photography Serge Oryan

This is one of those recipes that just came together in my head in 3 minutes.

1. I wanted to bake a cake.

2. I didn’t want it to contain eggs, milk or butter.

3. A cake that uses black treacle.

You may wonder, what’s the occasion? I have friends visiting me tomorrow.

Why no eggs – no milk – no butter? Because during Lent many friends abstain from eating meat and dairy, therefore my guests will have no reason to say no to my cake.

Why black treacle? Well for the simple reason that I still have a bottle since Christmas and I want to finish it;-)

The resulting DELICIOUS cake had a dark color, strong flavor and viscous consistency. The combination of treacle and aniseed is the secret to this succulent cake. There’s something flavorful about this blend that lights up my mood even on bad days. For some the taste of treacle, might be very strong and for those who love this taste, close to licorice if I may say, will fall in love with this recipe.

You can always use milk instead of water or if desired, use half milk and half water. You may also substitute the black treacle with date molasses. And if you decide to use all-purpose-flour then I suggest you add 2 teaspoons of baking flower. Many options can be explored but my one-advise is not to skip the aniseed addition!

Black Treacle Cake Recipe

Ingredients:

  • 3 cups self-rising flour
  • 2 tbsp ground aniseed
  • 1 cup vegetable oil
  • 2 cups black treacle
  • 1 ½ cups water
  • ½ cup slivered almonds

Directions:

  1. Preheat oven to 180°C. In a bowl, mix flour and aniseed. Add oil and stir to make a paste.
  2. In a separate bowl, combine treacle and water. Add gradually to the flour paste and mix.
  3. Grease a cake mold and pour batter. Make sure it’s flat and even. Sprinkle with almonds.
  4. Bake for approximately 40-45 minutes, or until top is springy to the touch and a wooden skewer inserted comes out clean. Allow to cool for 15 minutes in the pan before transferring to a plate.

Chef Emile’s Vegetable Salad

IMG_4430MayaOryan

Last year, my daughter’s class, Grade III, at school had to present POLAND on International Day. I, of course, offered my help to cook Polish food to be presented at our stall. Some moms signed in their name in my group before I even announce myself as a contributor. Thank you for your trust;-)

Well my menu and especially the salad, turned out to be a hit as people kept on coming back for more.

I thought the best is to serve something cold like salad and cake, as it’s going to be a lot of people coming at the same time for tasting after the dancing show. There were 1200 visitors and maybe 12 stalls. Salatka Jarzynowa is a traditional Polish salad that is served during holidays. It is prepared with root vegetables like carrot, potatoes and celery root. This salad is best prepared one day before as it needs to mature and tastes really better the next day. This was really convenient as part of the savory menu.

The best version to make it is my dad’s recipe; I did mention that my dad was a chef and I sure learnt from him a lot of cooking. His recipe has always been a star dish! It’s so consistent that we can eat this alone. I remember how he decorates it with shrimps or cold cuts, and always place it side by side with the turkey on Christmas. This year’s dinner was at my sister, and dad showed up with THE SALAD and they were both more than welcome.

Emile’s 2 important tips are: to prepare the vegetable salad with only vegetables that are not juicy, and to never skip the honey in the dressing.

I hate when one’s look at this salad and tells me I don’t eat potato salad, am like it’s okay to venture once, it’s not only potato … my genius dad taught me how to add Emmenthal cheese, ham and apple and this is the tastier salad you can ever eat!

My last request, please don’t open cans and throw in this salad, it only tastes better when you make it with fresh ingredients. How long does it take to chop little vegetables and let it boil for 10 minutes.

I really hope you enjoy this recipe and consider making it during holiday celebrations. As I said, it is best to prepare one day before serving.

For a fancier look, store it in a round container in the fridge, and just before serving, turn it upside down on a flat round plate and decorate with salami, cheese, salmon or shrimps.

Ingredients

  • 2 cups fresh potatoes, diced and cooked al dente
  • 1 cup fresh carrots, diced and cooked al dente
  • 1 cup fresh (or frozen) peas, cooked
  • 200g Emmenthal cheese, diced
  • 200g Ham or turkey ham/ slices of ½ inch thick, diced
  • 200g Granny Smith apples, diced
  • 2 tbsp gherkins pickles, sliced (optional)

Dressing:

  • 4 tbsp mayonnaise
  • 2 tbsp ketchup
  • 1 tbsp Dijon mustard
  • 1 tsp honey
  • Pinch of salt

Preparation

  1. To cook the potatoes, boil water and cook potatoes 7-10 minutes until cooked but still hard.
  2. Cook carrots and peas same as potatoes, and each one separately. Please don’t cook all together in same pot because the time of boiling varies for each one.
  3. Set aside to cool.
  4. Combine cheese, apples and pickles. Add to potatoes, carrots and peas.
  5. Mix all the ingredients of the dressing and toss in the salad. Combine well gently. I use a rubber spatula not to mash the vegetables. Refrigerate.

5 Reasons to Summer Detox

3 x detox juices


Aloha from the beach!

Here I am, lying in the sun having the time of my life while a breeze blows gently my hair.

I had a hectic month! Loads of photo-shoots and sleepless nights! I can’t believe that I’m spending this day being lazy without my phone ringing with reminders.

In the middle of this mayhem some parts of my life went off-track including my healthy eating habits. It was time to decide to give my body a break and start a cleansing diet. What could be more convenient than having a neighbor who owns the leading cleansing juicing business in Lebanon under the name of 5 a day☺!

Five bottles of juice were home delivered every morning. The juices were as fresh as a daisy. At the beginning, I asked for the 3 days plan, thinking that it’s way far than I can handle, but it turned out to be no MISSION IMPOSSIBLE and extended my program to 5 days. This scheme is designed to eliminate craving, remove toxins from the body and kick-start a healthy eating plan.

Here you go top 5 reasons to start a summer detox:

  •      Weight Loss
  •      Increase Energy
  •      Boost Metabolism
  •      Improve sleep
  •      Glowing Skin

Today is day 5! I can feel both my metabolism and immune system giving me a pat on the back, saying Way to go Maya!

If you want your system to give you the same pat on the back, it’s now the time to start a detox. Alternatively if you live in Lebanon I recommend you try 5 a day juices, your body skin and overall health will benefit and it will help you feel and look your sexiest!

Nourish your body with below healthy drinks recipes or try my Green Power Juice recipe posted earlier.

Carrot-Pineapple-Orange Juice

  • 1 cup pineapple cut into pieces
  • 4 carrots
  • Juice of 2 oranges
  • 1 thumb-size piece of ginger (optional)

Romaine-Apple-Spinach Juice

  • 2 cups romaine hearts
  • 2 cucumbers
  • 1 cup spinach
  • 1 celery stalk
  • 1 green apple

 Strawberry-Pomegranate Juice

  • 1 cup strawberry
  • ½ cup pomegranate seeds
  • Juice of 1 lime

Lavender Cookies

Anything that comes from my in-laws garden tastes heavenly and is a goodie because it hasn’t been treated with chemicals. Serge was visiting his parents last week and got back with a jar of dried lavender. I love lavenders, they look, smell and taste great, especially in cookies.

I make this recipe very often during spring. The sweet and fragrant flavor pop in these cookies by just adding a handful of dried lavender to my classic recipe. Everyone adores them!

Editor’s note: Your dough should come out firm. If it happens that it’s soft, chill the dough for half an hour before start working with it.

Ingredients

  • 1 cup/200gms room temperature butter, diced
  • 3/4 cup brown sugar
  • 1 egg, lightly beaten
  • 1tsp vanilla
  • 2 1/2 cups all-purpose flour, sifted
  • 2 tsp baking powder
  • ½ tsp Salt
  • 2 tbsp dried edible lavender flowers

Preparation

  1. Preheat oven to 180°C / 350°F, and place rack in the center of the oven. Line baking trays with parchment paper.
  2. Cream butter with sugar until light and fluffy.
  3. Beat in egg and vanilla.
  4. In a separate bowl combine flour, baking powder, salt and lavender.
  5. Gradually add to creamed mixture and mix until thoroughly combined.
  6. On a lightly floured surface, roll out each ball to an approximate thickness of 1/4 inch (6 mm). Dip cookie cutter in flour before cutting out shapes and transfer to baking sheet.
  7. Bake for 15 minutes or until golden brown.
  8. Let cool for 5 minutes then transfer to a wire rack to cool completely.

 Garnish with additional lavender flowers if desired.