Freekeh, A Festive Recipe

Freekeh-MayaOryan

Just when I finally learned how to regularly incorporate quinoa in my cuisine, another new grain starts surging in popularity, loaded with nutritional and healthy benefits, containing more fiber and double the amount of protein as rice. I’m talking about FREEKEH!

Freekeh, (frikeh, fah-reek or farik) is obtained from wheat that is harvested while the grains are still green, soft and immature. They are gently roasted so only the chaff burn and not the seeds. After roasting the wheat is thrashed and rubbed -thus the name in Arabic fareek, which means rubbed. Grains inside are too moist to burn and the result is a smoky, nutty wheat with a distinct taste.

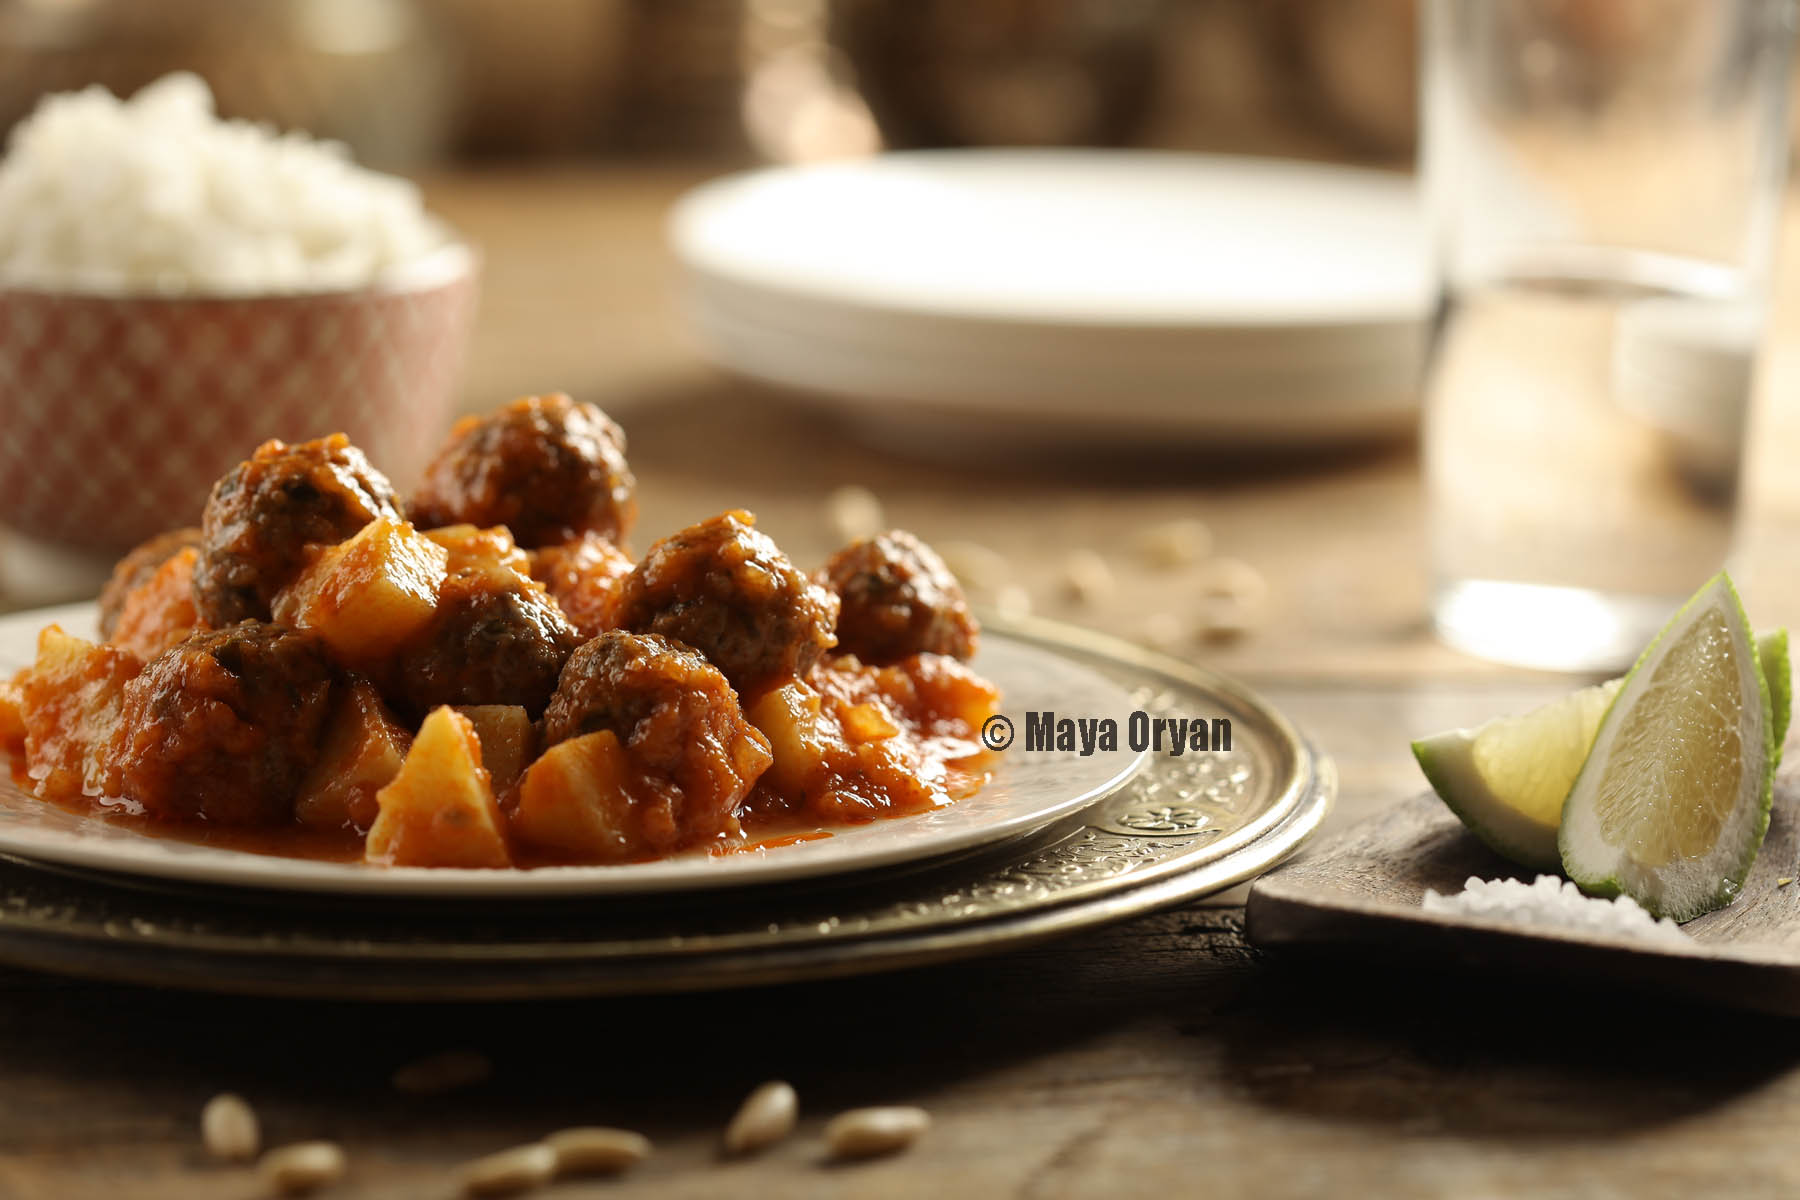
Recipes passed from one generation to another, have always a special place in our hearts especially if it brings along all the wonderful souvenirs from our childhood.

My dad’s hometown is Jdeidet Marjeyoun, located in the south of Lebanon, where freekeh is part of the town’s culinary heritage. He cooked us meals using Freekeh only on special occasions. For a long time I somehow forgot about this grain, until recently I started to use it more often, and just like my dad “on special occasions”!

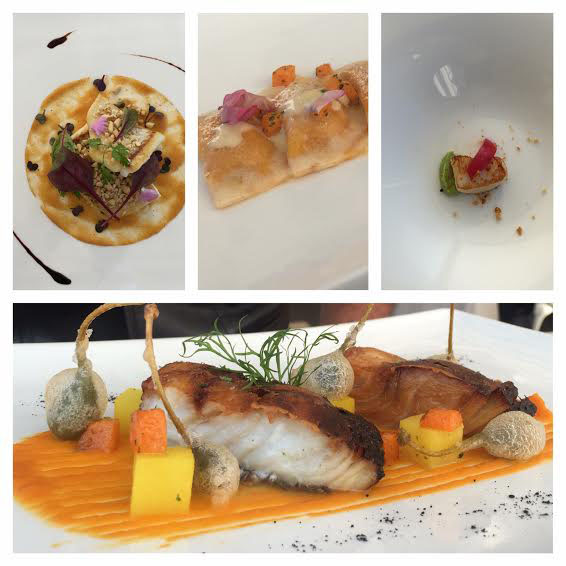
This festive recipe brings joy to my guests and family, tasting delicious and looking outstanding. Can easily combined with your favorite chicken recipe, beef or lamb. I chose today to cook it with vegetables and top it with salmon.

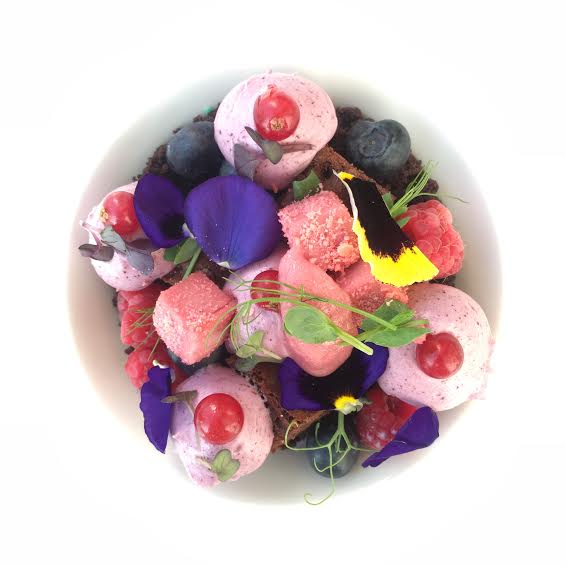
The wait is over, time to knock out old recipes and try something different and bedazzling, this Christmas!

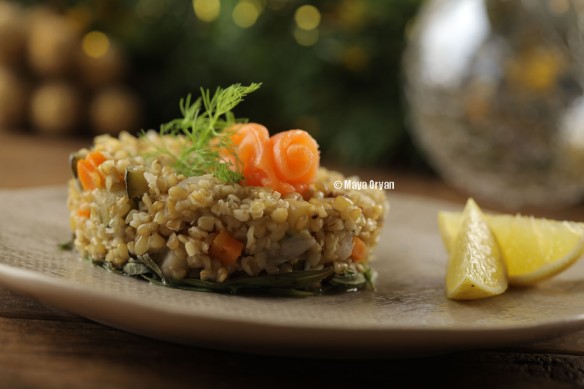
Vegetables and Smoked Salmon Freekeh

Ingredients:

  • 1 tbsp vegetable oil
  • 1 medium size white onion, finely chopped
  • 2 cups frikeh, washed and soaked at least 1 hour
  • 4 cups boiling water
  • 1 cup zucchini, diced
  • ¾ cup carrots, diced
  • ½ cup artichoke bottoms, diced
  • 2 tbsp butter
  • 1 cup white wine
  • 1 cup vegetable stock
  • Salt and pepper to taste
  • Thyme leaves (optional)
  • Smoked Salmon, to garnish

Directions:

1.In a medium saucepan, heat oil and sauté the zucchinis, the carrots and the artichokes until cooked. Season with salt.

2.In a separate heavy bottomed pan, melt the butter and add the onion, stirring occasionally, until soft and transparent. Add in the freekeh and cook, for 2 minutes.

3.Add wine to the softened onions and cook until the liquid has evaporated off.

4.Pour in 1 cup of boiling water and cook, stirring occasionally with a fork, until liquid is almost absorbed. Repeat this process until freekeh is thick and creamy; the freekeh should still have some chew to it. Season to taste.

5.If the freekeh is still hard. It has to be cooked with additional boiling water.

6.Once the freekeh is cooked, mix in the vegetables and finish with 1 cup of stock. Let simmer a couple of minutes until it is entirely absorbed.

7.To transfer this meal into a festive dish, put freekeh in a small serving bowl and top it with thyme leaves. Cover the bowl with a dinner plate and flip it swiftly upside down. Decorate it with smoked salmon and lemon wedges and serve immediately.


Yellow and Red Cherry Tomatoes Caprese Salad


1.Yellow and Red Cherry Tomatoes Caprese Salad

Photography Serge Oryan

The beauty of Italy never ceases to amaze me, from north to south, armed with many authentic places (and recipes!!!) I fall in love with each city I visit. I was in Rome this month for my Birthday. My precious husband treated me with a 5-stars vacation and spent his time spoiling me.

What fall under the culinary section during my trip, are lots of Parmesan cheese, seafood and sparkling wine. From casual street food to Michelin starred restaurants, Italian cuisine is as influential as Rome’s artistic and historical assets. I selected only a couple of places to talk about, the ones I really want to visit again upon my next trip.

The first night we had dinner at Rinaldi al Quirinale, 11 via Parma, the next day we came back for their orange marinated salmon, Salmone Marinato all’Arancio; the best I ever had! On the way to Rinaldi, at the southern end of via Nazionale, my husband couldn’t resist the fab’ smell of the fresh and crunchy fries at Queens Chips. He ordered a piccolo (small) size, which was really a massive portion of freshly fried chips and sauce for €2.50!

Rome2015

After a long shopping day around the Spanish steps I was in the mood for some Italian cheese, fresh smoothie and a hearty salad. Ginger restaurant, via Borgognona 43/44, was the best place for that. The menu is a compilation of gourmet treats, well presented in a white, modern and trendy environment. They serve light meals, fresh salads and sandwiches. Not only I enjoyed my cheese selection with a refreshing Caienna smoothie (Avocado, dates, banana, almond milk) and a Fossa salad (Mixed salad leaves, yellow and red lettuce, rocket, spinach, dried tomatoes, turkey, goat cheese, organic walnuts, green apple), but I also got to meet and chat with the talented Soprano Zeina Barhoum, who happened to be sitting right next to us.

On our way back from the Colosseum we stopped by Aroma restaurant where we booked a table for lunch. This gourmet restaurant has been awarded with 1 Michelin star and its regional cuisine has been recognized with 5 Star Diamond Award! It offers a spectacular view on the Colosseum, highly recommended for a special event (like my birthday!!). The food was exquisite and creative and the attentive staff follows the chef’s dedication. This dining experience was so momentous and exceeded our expectations.

The Aroma2

ZAroma

On the last eve, I went to a gourmet store and bought fresh mini mozzarella balls, as I was dreaming about Caprese salad. My recipe is so simple and totally relies on the freshness of the ingredients. It requires no slicing at all. Combine all ingredients and toss with best quality olive oil. There’s absolutely no excuse for using average olive oil in your salad. The key to a perfect Caprese salad is to use only the good stuff. Don’t add pesto or balsamic vinegar; the less improvement you do, the better. The recipe is a classic as it is, do yourself a favor and don’t try to ameliorate it. It doesn’t matter what kind of tomatoes you use as long as it’s fresh! I love to use yellow and red tomatoes, as this slight twist adds elegance to the presentation also the sweetness of the yellow tomato rounds off the creaminess of the mozarella. Enjoy!

Yellow and Red Cherry Tomatoes Caprese Salad

Ingredients

  • 100 g red cherry tomatoes, washed and rinsed
  • 100 g yellow cherry tomatoes, washed and rinsed
  • 150 g mini Mozzarella Cheese balls
  • A handful of fresh basil leaves
  • Dried oregano, to taste
  • Extra virgin Olive Oil, to taste
  • Coarse Sea Salt, to taste

Preparation

Combine tomatoes and Mozzarella balls. Sprinkle with basil leaves, oregano and salt. Drizzle with extra virgin olive oil.

Serve with Italian grissini or some crusty bread.

Meatballs, Potatoes and Rice – Daoud Bacha w Riz

Daoud Bacha and Rice - Photo by Serge Oryan

Daoud Bacha and Rice – Photo by Serge Oryan

If I were ever granted one superpower, I’d want the ability to manipulate time. Forward. Stop. Rewind.

It would come in helpful to forward insignificant days, zap undesirable phases, lap disappointing circumstances.

If I can stop time it will enable me to do all the things I want and I will never miss a deadline. How many times you wished for a moment to never end, for a pleasure to prolong in measures you never reached before, for those thrilling feelings to last longer.

If I can rewind time, I will have perfect control over my destiny. Not only I’d use this ability to catch back opportunities I never thought they were important, but also to run through again memories and time that touched my heart.

If you were granted one superpower, what would it be?

Last time I did meatballs, my friend Carole who lives in Dubai came over for lunch with her beautiful daughters, we sat all around the table and enjoyed a meal together and laughed. How I wish right now to rewind this day and live it as is all over again:)

Meatballs, Potatoes and Rice

Ingredients

  • 450g beef ground meat
  • 1 egg
  • 3 tbsp breadcrumb
  • 3 tbsp Parsley
  • Salt and Pepper, to taste
  • 1 tbsp flour
  • Vegetable oil
  • 1 large onion, chopped
  • 2 garlic cloves, minced
  • 2 cups potatoes, diced
  • 4 tomatoes, diced
  • 1 tbsp tomato paste
  • Pine nuts, toasted (optional)

Directions

In a small bowl, sprinkle the meat with salt, pepper and parsley, add the egg, flour and breadcrumbs and mix. Make small balls.

Heat oil in a large pot and add the meatballs to cook until browned on all sides. Remove from pot and set aside.

In same pot, add oil and drop in the onions and garlic to fry until golden. Add potatoes and tomatoes and mix gently. Cover with water and let it simmer on medium heat. Spoon the tomato paste in and season with salt and pepper. Continue to cook for about 20-25 minutes.

Sprinkle with pine nuts and serve with rice on the side.

Maamoul With Pistachios or Walnuts

Maamool-MayaOryan

It’s this time of the year where the neighborhood smells sweet. Housewives and women of the family would be traditionally gathering right now to bake batches of Maamool. The aroma sneaks out of the oven to reach every sense of smell around and makes one desire to eat Maamool instantly. Hopefully this ritual will never go out of style, as it adds excitement to this beautiful occasion.

Maamool is very popular in Lebanon during Easter and I’ve been asked for the recipe hundreds of times. I hope you will love it as much as I do and appreciate the artist behind this elegant treat. I think who ever invented it, did care about each of his taste buds. Who would have thought about the mix of this fragrant dough coming from the combination of the rose water and the orange blossom water. The result is a delicious cookie that melts in your mouth and the pistachio filling gives it a soft chomp. Impressive!

Maamoul With Pistachios or Walnuts

For 30 pieces

Ingredients

Maamoul Dough

  • 3 cups coarse semolina (ferkha)
  • 2 cups fine semolina (smeed naim)
  • ½ cup of sugar
  • 3 sticks/300g of butter, melted (and let cool down) I use Lurpak blocks
  • 100ml of rose water
  • 30ml/2 tbsp of orange blossom water
  • ⅙ teaspoon instant yeast

Nut Filling

  • 200g of coarsely crushed unsalted pistachio nuts or unsalted walnuts
  • ¾ cup of regular sugar
  • 2tbsp of rose water
  • 3tbsp of orange blossom water
  • Icing sugar to decorate

Preparation

  1. Mix coarse semolina, fine semolina and sugar together.
  2. Add yeast and melted butter and rub with hands until well combined.
  3. Gradually pour WARM orange blossom water and rose water, kneading the dough gently with hands. Place the dough in a large bowl and cover with a wet kitchen towel. Let it sit for 1-2 hours at room temperature.
  4. To make the filling, combine all ingredients.
  5. Divide the dough in 2. Scoop walnut size of maamoul dough and flatten it on the palm of your hand, fill it with pistachios or walnut filling and make a ball. Repeat this step until you finish the dough.
  6. Press gently each ball into a traditional “Maamoul” mold to take shape and tap out on the baking sheet to drop out of the mould. If the dough is sticky, lightly flour the mold.
  7. In a preheated oven 200C/400F bake the maamoul cookies for about 15-20mn or until the sides are slightly golden.
  8. Sprinkle with icing sugar, while still hot. Let cool down and sprinkle again until fully covered.

My Valentine Red Velvet Cake

Valentine Red Velvet Cake

Kids had few days off school as part of their winter break and instead of taking them to a ski vacation we flew to sunny Dubai and stayed at one of our favorite resort Atlantis the Palm, where kids had an amazing time on the beach with mommy (myself hihihi)  and friends. We’re lucky to have so many friends living in Dubai, which always makes of our vacation an unforgettable one.

Back to my kitchen and to my baking passion, an old recipe of a red velvet cake shouted at me across the room to urgently make it; I was so powerless over its lusciousness and didn’t hesitate for a second.

I usually prefer dry cakes without any frosting on, but this combination of red velvet cake and vanilla cream cheese frosting is gorgeous and I’m sure once you try it you will stay hooked.

I had fun writing words with my children to top each slice of the cake, we wrote much more than we needed as some of them got broken while peeling them off the paper, but no one minded eating an extra piece of chocolate, they clearly have a sweet tooth like mommy.

Red Velvet Cake

Ingredients:

  • ½ cup unsalted butter, at room temperature
  • 1 ½ cups sugar
  • 2 eggs, at room temperature
  • 1 tsp vanilla extract
  • 3 tbsp unsweetened cocoa powder
  • 3 tbsp red food coloring
  • 2 ½ cups all-purpose flour
  • 1 tbsp baking powder
  • ½ tsp salt
  • 1 cup milk, at room temperature
  • 1 tsp white vinegar
  • 1 tsp baking soda

For the cream cheese frosting

  • 450g / 16 oz. cream cheese, at room temperature
  • 3 tbsp butter, at room temperature
  • 1 tsp vanilla extract
  • 2½ cups icing sugar, sifted
  • Pinch of salt
  • 100g dark chocolate to make the toppers (optional)

Directions:

Preheat the oven to 185°C. Grease and flour two 9-inch round cake pan.

In a large bowl, using a hand mixer or a stand mixer, beat butter and sugar. Beat in eggs, one at a time. Beat in vanilla.

Mix together cocoa powder and food coloring to form a paste and add it to the egg mixture.

Sift together flour, salt and baking powder. Add the flour mixture, gradually to the egg mixture, alternating with the milk, beat until well incorporated, making sure to scrape down the bottom of the bowl with a spatula.

Mix baking soda and vinegar together and add.

Divide batter into prepared pans. Bake 30-40 minutes, until cake springs back when gently pressed with finger.

Cool the cakes in their pans on a wire rack for 10 minutes. Remove the cakes from the pan, and allow to cool completely before frosting.

To make the frosting: Whisk together cream cheese and butter until smooth.

Add, sugar, vanilla and salt and beat on medium-high speed until well combined.

To assemble, place one of the cakes top side-down on a cake stand or plate. Spread the cream cheese over the top. Top it with the second cake and now spread the remaining cream cheese to cover the cakes from all sides, and decorate if desired.

To make the toppers: Melt chocolate over a bain-marie and fill it in a squeeze bottle or a piping bag. Write words (like love, kisses, hugs, xoxo, valentine) on a wax paper and wait few minutes to cool. Once the chocolate is hard, peel it off the paper and insert it gently in the cream.

Chocolate Stout Cake

Photography Serge Oryan

Photography Serge Oryan www.sergeoryan.com

I don’t remember having a cake with beer inside until few months back when I was in New York City. My friend insisted that I try some, telling me that it doesn’t taste like beer at all. She was right it doesn’t taste the beer, but the stout inside adds a twist that calls you for a second bite and more. It’s moist, unlike you might be thinking it’s not bitter, but does have a deep tang.

I browsed few recipes online, all very similar. Most use sour cream, but I prefer the fresh organic yogurt I get straight from the farm. I used Almaza Lebanese beer, which I love, but you can use Guinness or your favorite dark beer.

I baked this same cake twice this week, and every single bite was a true dose of happiness!

Ingredients:

  • 100g / 1 stick butter, melted
  • 1 ½ cup dark beer
  • ½ cup milk
  • 3 eggs
  • 1 tsp vanilla
  • ½ cup plain Greek yogurt
  • 2 ½ cups all-purpose flour, sifted
  • 2 cups light brown sugar
  • ¾ cup unsweetened cocoa powder, sifted
  • 1 tsp baking soda
  • Pinch of Salt

Directions:

  1. Pre-heat the oven to 185°C. Grease and flour a cake pan.
  2. In a large bowl, using a hand mixer or a stand mixer, beat butter, beer, and milk. Beat in eggs, one at a time. Beat in vanilla. Add yogurt and mix until incorporated.
  3. In a large bowl, combine flour, sugar, cocoa powder, baking soda and salt.
  4. Fold the dry flour mixture, gradually in the wet beer mixture, making sure to scrape down the bowl with a spatula.
  5. Spoon batter into prepared pan. Bake 40-50 minutes, until cake springs back when gently pressed with finger.
  6. Let cool in pan on rack.

Mulberry Jam and Scones

SconesMulberries-MayaOryan

When we were young we used to go camping at an elevation of 1,550 meters (5,090 ft) in Faqra, Lebanon. Two things I still remember from that splendid location; playing around the ruins of the Great Temple of Faqra, where the earliest civilizations worshiped their God. And a bountiful Mulberry tree that got me in trouble with mom every time I lay my hands on (and return home with purple fingers and stained clothes). I was nut for those sweet little berries and it was well worth every garment my mom ditched;-)

As messy as it may get, I still impatiently wait for my share of mulberries that my mom-in-law sends us seasonally. Mulberries have high levels of protein and iron and help loosing weight by blocking sugar. We all don’t mind that last point, no! The second batch I received was almost overripe so I found a good use of them; squeezed some to make syrup “sharab toot” and preserved the rest as jam.

While the mulberries were boiling to make jam, I thought to myself having this under my belt now, it sure tastes better with rich, flaky, soft scones. Sitôt dit sitôt fait, and the scones were baking in the oven.

MulberryJamOnFire

… later when mulberry jam was served with scones, I should probably had someone hiding the plate from me because it was kind of hard to stop eating!

And this how I make it:

Mulberry Jam

Ingredients

  • 1kg fresh ripe mulberries
  • 750g sugar
  • 2 tsp lemon juice

Preparation

  1. Pull all the stems of the fruits and put them into a large saucepan.
  2. Heat it over medium heat and crush the berries to squish out the juice.
  3. Bring it to a boil then add the sugar and lemon juice.
  4. Reduce the heat and stir the mixture until the sugar dissolves.
  5. Bring it back up to the boil for a few minutes and then bottle and seal the jam.

Scones Recipe

Preparation Time: 10 minutes – Cooking Time: 15 minutes 

Ingredients

  • 3 cups / 350g self-raising flour
  • 3 tbsp sugar
  • ¾ cup / 85g butter, diced
  • 1 tsp vanilla
  • 1 egg beaten
  • ¾ cup / 175 ml milk
  • 50g sultanas
  • Self-raising flour for dusting

Preparation

  1. Preheat oven to 220°C. Mix the self-raising flour, sugar and the butter into a large bowl; rub in butter using your fingers until mixture resembles breadcrumbs.
  2. Whisk together the egg, the milk and the vanilla; reserve 2 teaspoons for glazing.
  3. Add the sultanas and the egg mixture to the flour kneading gently to a dough.
  4. Press dough out on a floured surface to 2cm thickness and cut out the scones out with a round 6cm cutter.
  5.  Glaze with the beaten egg and place the scones 2 cm apart on a baking tray into the oven for 10-12mn.
  6. Let it cool on a wire rack while covered with a clean tea towel for a soft scone result.

These are best served slightly warm and homemade mulberry jam.

Passion Fruit Lemonade

LemonadePassionFruit-BlogWhen I was living in Dubai, I never ran out of passion fruit. It used to be available all year round and at a very reasonable price. During the decade I lived in the UAE, I tried passion fruits in baking, in desserts, in juices, in smoothies and it has quickly became one of my favorite exotic fruits.

Until I moved to Lebanon, I never found nice, purple, juicy passion fruits, and if I do find in the imported fruits section, it will not be for less than 25$/per kilo!! Yesterday I got lucky with some local, organic passion fruits, smelling like heaven. Finally we started to grow them locally and the price dropped to 2$/per kilo.

I hurried home to make my most refreshing passion fruit lemonade recipe. Summer is here and it’s very hot! Freshly squeezed lemon juice and passion fruit pulp, came to my rescue in this hot climate, tasting like an exotic vacation in a martini glass.

For a lazy version, buy fresh lemonade and scoop out pulp of passion fruits inside your glass. I’m sure this soon will become a hit at your parties. Smile and cheers!

Ingredients

  • 1½ cup fresh lemon juice (2 to 4 lemons)
  •  3 cups cold water
  •  ½ cup sugar
  • 6 passion fruits, cut in two

Preparation

In a jug, combine water and lemon juice and stir in sugar until dissolved. Scoop out pulp of the passion fruits with a teaspoon and stir it in. Add ice cubes if desired and serve.

Figs and Brie Cheese Quiche


Picture taken by my talented daughter Kaia:)

Picture taken by my talented daughter Kaia:)

One of my clients sent me a pack full of pastries; shortcrust ready rolled, puff cases, filo sheets, … asking me to give him my feedback about the quality of the product.

So I spent the week, eating tarts, quiches and samosas! Not that I’m complaining. I guess you should know by now that my love for baking is unconditional.

Ready rolled pie pastries are one of my much-loved ingredients, especially after a long day at work. I often line my pie dish, flute edges and then open the fridge and think about the filling. Recipes with shortcrust pastries are versatile and trouble-free. I don’t think it is said easy as pie for nothing;-)

I wanted to break away from routine ingredients so I started with a pesto rosso spread, topped it with some blue cheese, slices of brie, sprigs of thyme, and dried figs. The outcome was a hit through! I served it for some friends visiting in the evening and as soon as I saw their heads nodding I knew I had the green light to share the recipe with you all.

KaiaOnSet-LR

Ingredients

  • 1 Pack of Shortcrust Pastry or “Pâte Brisée”
  • 2 tbsp pesto rosso
  • 2 tbsp blue cheese, crumbled
  • 150g Brie cheese, sliced
  • ¼ cup fresh thyme leaves
  • 5 dried figs, sliced
  • 5 eggs
  • ½ cup low-fat milk
  • Salt and Pepper, to taste
  • Maple syrup to drizzle

Preparation

  1. Pre-heat oven to 180°C.
  2. Roll out dough on floured surface. Transfer to pie dish. Trim and flute the sides. Pierce crust all over with fork.
  3. Start by spreading the pesto on the crust.
  4. Distribute the blue cheese and decorate crust with slices of brie in a fan shape.
  5. Add thyme and figs.
  6. Beat eggs well. Add milk, pepper and salt. Pour over the filling and place pie dish on the middle oven rack.
  7. After 20mn, drizzle with maple syrup and place it back in the oven for another 10 to 15mn.
  8. Transfer tart to rack; cool 5 minutes.

Kibbet La’teen or Pumpkin Kibbeh Balls

KibbehMayaOryanDubai is calling me again and I have to travel next weekend. My trips are getting closer with time and I’m kind of used to it now, it’s in the system!

It’s actually in the entire family’s system (laughing). My mom offers her baby-sitting services before she accepts any invitation from her friends. My husband waits until I come back to travel so we don’t both leave the kids at the same time. My sisters cook always a little bit more to send it to us and my daughters have always a wish list of gifts ready for me to get them when I travel. I’m so blessed!

Thank you all for your support and for understanding how much I love what I do.

Well, everybody knows that when I’m not styling food, I’m still very busy doing everything else. I’m much more productive than every woman I know who has no job. I don’t know if it’s my energy that keeps me on the go, or simply the guilt feeling that I’ve been away from my family to work and I have to make it up for them. I exercise every day. I cook two meals (stirring in one hand and whatsApp-ing with the other). I tend to be the perfect wife, the fit mom, the present friend and the career woman.

My friend says it’s my adrenaline, I simply think I’m well organized.

It requires nothing but good planning (and love life). I don’t want one day to look back and realize that I wasted my life only dreaming.

Those beautiful pumpkin kibbeh balls are a dream coming true. Well I’d be cheating on you if I say I made them, because my mother-in-law did. And as long as she is sending it to us regularly I doubt that I will try it any soon;-)

Pumpkin kibbeh balls are more popular during Lent and among vegetarians. For those of you who’d like to adventure in the kitchen, making this recipe, it’s somehow long but worth every effort.

Ingredients

Stuffing

  • 2 tbsp frying oil
  • 1 onion, sliced
  • 3 cups Swiss chard, chopped
  • ½ cup chick peas
  • 200g chopped walnuts
  • 50g toasted pine nuts
  • 1 tsp salt
  • 1 tsp sumac
  • 2 tbsp lemon juice
  • ½ tsp ground cumin (optional)

Meatballs (kibbeh)

  • ½ kg fresh pumpkin, boiled, pureed and drained in a sieve for 10 hours.
  • 1 onion, minced in a processor
  • 80g bulgur wheat
  • 2 tbsp plain flour
  • 1tsp salt
  • 1 tsp all spice
  • 1 tsp dried basil

Preparation

  1. In a heavy-bottomed saucepan, sauté the onion until brown and soft. Add Swiss chard, chickpeas, walnut and pine nuts and fry. Turn off the heat, add seasoning, lemon juice and set aside.
  2. Process onion, pumpkin purée and bulgur wheat. Add seasoning and flour, mix and let it cool in the fridge for at least 1 hour. If mixture is too hard add few drops of water.
  3. Moisten your hands and form kibbeh mixture into egg-size balls. With your index finger, make a hole on one end of the oval ball and spoon one tablespoon of filling inside and pinch the end to seal.
  4. Fry the kibbeh in cooking oil in batches or if desired, roast it in oven for about 25mn.
  5. Place the kibbeh on a serving dish and serve with cucumber yogurt salad.