I read somewhere that Matt Damon went on a 90-day diet before his Odyssey movie, and apparently lost enough weight to look slimmer than he has since college. Lucky!!
I have absolutely no idea whether that story was even meant to be inspiring, but somehow, without any further details, it motivated me to start my own 90-day no-gluten, no-sugar challenge.
Not for any particular reason, really. Just a little personal challenge, a change from my usual routine (outside of Lent!), and mostly to see how I would feel.
The short answer? I feel great.
But what I’ve enjoyed even more is how my eating habits have naturally become much healthier. I’m eating more protein, more nuts, more seeds, more fruit… and I’ve been having so much fun trying new recipes and putting my own spin on some of my old favourites, like my homemade granola.
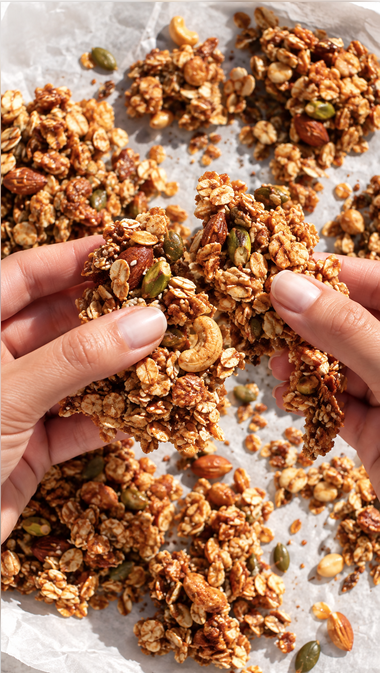
I’ve made quite a few granola recipes over the years, but this one really caught my attention because of its beautiful Mediterranean flavours such as tahini, honey, olive oil, pine nuts and pistachios. I started playing around with the quantities and adding a few of my own touches until I found a combination I absolutely loved. The result is crunchy, nutty, lightly sweet, and beautifully fragrant with orange blossom and tahini.
What I especially love is that it isn’t overly sweet. I prefer my granola that way, but if you like yours sweeter, simply add a little more honey. You can also replace the honey with molasses, or add cranberries or other dried fruits to the jar after baking for an extra touch of sweetness.
Along the way, I also discovered a little granola secret: egg whites help everything bind together, giving you those beautiful big clusters instead of lots of tiny pieces.
And after a few trials, I found that baking it at 160°C gives me the best result and helps prevent the bottom from getting too brown. Ideally, spread the granola in an even layer on parchment paper rather than directly on the baking sheet.
For a gluten-free version, just make sure you use certified gluten-free oats.
And you know me: if I post a recipe on my blog, it means I’m really, really happy with it and excited to share it with you. ❤️
So here it is.
Orange Blossom, Tahini & Honey Granola
Yield: approximately 8–10 cups
Texture: deeply crisp, golden and crunchy with large clusters
Ingredients
Dry ingredients
- 4 cups rolled oats
- 1½ cups mixed nuts, roughly chopped (I used pistachios, cashew nuts, almonds, pine nuts)
- ½ cup pumpkin seeds
- ¼ cup sesame seeds
- 1 tablespoon chia seeds
- 1 tablespoon flax seeds
- 3 tsp ground cinnamon
- 1 tsp fine sea salt
Wet ingredients
- ⅓ cup honey
- ¼ cup extra-virgin olive oil
- ¼ cup tahini
- Zest of 1 orange
- 2 tbsp orange blossom water
- 1 tbsp finely grated orange zest
- 2 large egg whites, lightly whisked
- ½ tsp vanilla extract (optional)
1. Prepare the oven
Preheat the oven to 160°C / 320°F
Line a large, rimmed baking sheet with parchment paper.
For especially chunky granola, use a large tray so the mixture can spread into one compact, even layer without becoming too thick.
2. Combine the dry ingredients
In a large bowl, combine:
- rolled oats
- chopped nuts
- pumpkin seeds
- sesame seeds
- flax seeds
- chia seeds
- cinnamon
- salt
Mix thoroughly so the cinnamon and salt are evenly distributed.
3. Prepare the wet mixture
In a separate bowl, whisk together:
- honey
- olive oil
- tahini
- orange blossom water
- orange zest
- vanilla, if using
Warm this mixture very gently if the honey or tahini is thick. It should be fluid but not hot.
In another small bowl, lightly whisk the 2 egg whites until they become slightly foamy. They do not need to be whipped into peaks.
Add the egg whites to the honey-tahini mixture and whisk until evenly combined.
4. Combine
Pour the wet mixture over the dry ingredients.
Using a large spatula, fold everything together until every oat, nut and seed is lightly coated.
Don’t overmix or mash the mixture.
5. Form the clusters
Transfer the mixture to the prepared baking sheet.
Spread it into an even layer approximately 1–1.5 cm thick.
Now comes the important part:
Firmly press the granola down with the back of a spatula or the bottom of a flat glass.
You want the mixture compressed into one cohesive sheet. This is what helps create those beautiful clusters.
6. Bake
Bake at 160°C / 320°F for 25–35 minutes.
After approximately 15 minutes, rotate the tray if your oven browns unevenly.
Do not stir the granola.
Continue baking until the surface is deep golden and the edges are noticeably darker and crisp.
If the edges are browning too quickly while the center remains pale, reduce the oven to 150°C / 300°F for the final 5–10 minutes.
7. The most important step: don’t touch it
Remove the tray from the oven.
Do not stir, break or move the granola.
Leave it completely undisturbed on the baking sheet for at least 45–60 minutes, preferably until completely cool.
It will become significantly crispier as it cools.
Once completely cold, break it into large irregular clusters with your hands.
8. Storage
Store in an airtight container at room temperature.
Allow the granola to cool completely before closing the container. Any residual warmth will create condensation and soften the granola.
It should remain crisp for approximately 2 weeks when properly stored.
Chef’s notes
For maximum crunch: Don’t make the layer too thick and don’t stir while baking.
For larger clusters: Press the mixture down firmly before baking and leave it completely untouched while cooling.
For a more delicate crunch: Use slightly smaller clusters and reduce the baking time by a few minutes.
Now go make it — and please send me pictures when you do!