Lebanese Classic Rice pudding or Riz Bi Haleeb

Image

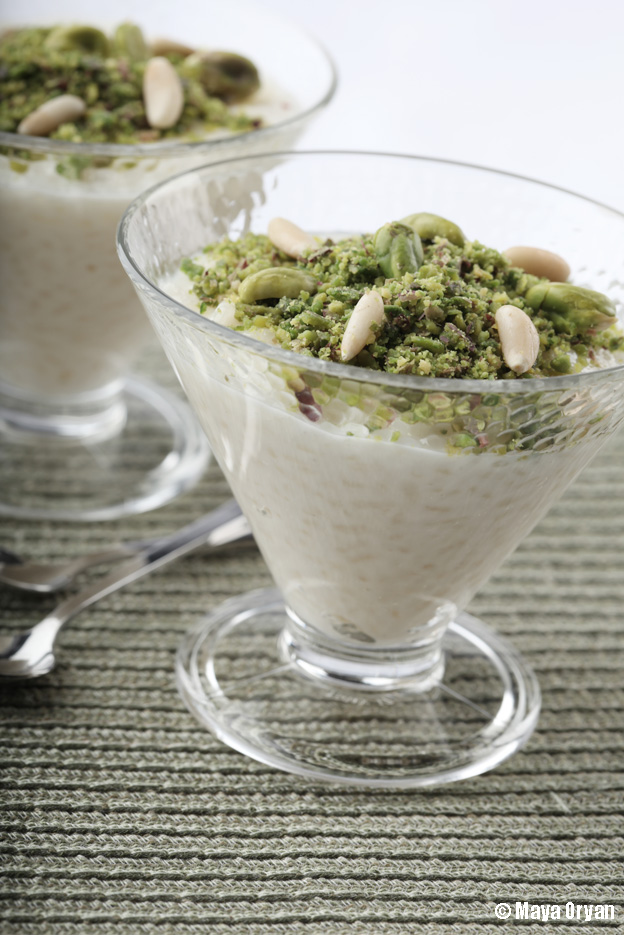
Rice pudding was Kaia’s first favorite food. I used to cook it more when my girls were teething☺ I consider it more of a baby food than a dessert, because it reminds me of them sitting in their high chair enjoying eating Riz bi Haleeb.

It is an easy and simple recipe to prepare for the whole family. Every country around the world has its own version of rice pudding. I find the Lebanese recipe the best I’ve ever tasted. Perhaps, because of the use of the mastic gum that gives it a little of a light chewy feel and the aromatic fragrance of the orange blossom water.

Hope you and your kids enjoy this great old-fashioned dessert!

Ingredients

  • 3 cups full fat milk
  • ½ cup white sugar
  • ½ cup short grain white rice
  • 1 cup water
  • 1/4 tsp mastic powder, pound
  • 1tbsp orange blossom water
  • Unsalted whole pistachios, to decorate
  • Unsalted ground pistachios, to decorate
  • Pine nuts, to decorate

Preparation

  1. Pour milk in a medium-sized, heavy-bottomed saucepan, add sugar and bring to a boil.
  2. Add the rice and water. Stir well.
  3. Cook over medium heat for about 30mn or until the mixture is creamy, stirring constantly, making sure the rice doesn’t stick at the bottom of the pan.
  4. Add the mastic powder and the orange blossom water and cook for another 15mn until thickened.
  5. Remove from heat. Spoon the rice evenly among serving bowls.
  6. Decorate with pistachios and pine nuts. Served chilled.

Lavender Cookies

Anything that comes from my in-laws garden tastes heavenly and is a goodie because it hasn’t been treated with chemicals. Serge was visiting his parents last week and got back with a jar of dried lavender. I love lavenders, they look, smell and taste great, especially in cookies.

I make this recipe very often during spring. The sweet and fragrant flavor pop in these cookies by just adding a handful of dried lavender to my classic recipe. Everyone adores them!

Editor’s note: Your dough should come out firm. If it happens that it’s soft, chill the dough for half an hour before start working with it.

Ingredients

  • 1 cup/200gms room temperature butter, diced
  • 3/4 cup brown sugar
  • 1 egg, lightly beaten
  • 1tsp vanilla
  • 2 1/2 cups all-purpose flour, sifted
  • 2 tsp baking powder
  • ½ tsp Salt
  • 2 tbsp dried edible lavender flowers

Preparation

  1. Preheat oven to 180°C / 350°F, and place rack in the center of the oven. Line baking trays with parchment paper.
  2. Cream butter with sugar until light and fluffy.
  3. Beat in egg and vanilla.
  4. In a separate bowl combine flour, baking powder, salt and lavender.
  5. Gradually add to creamed mixture and mix until thoroughly combined.
  6. On a lightly floured surface, roll out each ball to an approximate thickness of 1/4 inch (6 mm). Dip cookie cutter in flour before cutting out shapes and transfer to baking sheet.
  7. Bake for 15 minutes or until golden brown.
  8. Let cool for 5 minutes then transfer to a wire rack to cool completely.

 Garnish with additional lavender flowers if desired.

Another Lebanese Dessert, the Snayniyeh!

Lebanese are very special when it comes to languages. I, like many Lebanese, speak to my daughter in French, send her to a school where she learns English and Arabic and lives in a country where the spoken language is Lebanese.

Gulf countries have a translation for every foreign word while we Lebanese have our own mishmash of languages, we don’t mind speaking 3 languages in one sentence; if it’s a computer then let’s call it a computer and not “hassoub”, and if French call it Filet, don’t think hard, everybody knows what Filet de boeuf is. I love this! It’s not complicated!

So when Kaia, asks me: “Mom what is cheese in Arabic?”, I proudly answer: “Jibneh”, but if she asks: “What is Cheese Cake?”. I answer: “It’s Cheese Cake!” Who knows what Gateau jibin is!

This morning she asked: “What is Snayniyeh in French?” I said: “It’s Snayniyeh!”. “And in English?” I answered: “Also Snayniyeh!”. She smiled and said: “It’s funny!

Fair enough, no? Italians have Tiramisu and Panna cotta we Lebanese have Snayniyeh and Meghleh. Why try calling it anything else!

Every name hides a little story behind. Snayniyeh is derived from “snan”, which means teeth in Lebanese and this scrumptious dessert is usually prepared to celebrate the appearance of a child’s first tooth. A sure phenomenal event for every mom!

I love our traditions! Meghleh to celebrate the birth of a child, Snayniyeh for teething, Maamoul for Easter and Awwamat for Ghtas (Christ’s baptismal night), isn’t it sweet☺

The name Snayniyeh put a smile on many faces as it brings back sweet memories! It’s simple and healthy and this is how I make it.

Ingredients

  • 1cup hulled wheat, washed and rinsed (in Arabic ameh ma’chour)
  • 1lt water
  • 1 large pomegranate, peeled and seeded
  • 3/4cup icing sugar
  • 1/2cup orange-blossom water
  • 1/2cup pistachios, soaked in water for about 1 hour
  • 1/2cup almonds, soaked in water for about 1 hour
  • 1/2cup walnuts, soaked in water for about 1 hour
  • 1/2cup sugared chick peas

Preparation

  1. Cook the wheat in boiling water for an hour or until tender and all the liquid has been absorbed.
  2. Remove from heat and stir in icing sugar and orange-blossom water.
  3. Mix with the pomegranate seeds.
  4. Scatter the rest of the ingredients on the top and serve hot or cold.

Mama’s Sfouf

I’m back to my kitchen, to my bed and most importantly to my family. Gosh! I missed my hubby and daughters. Four weeks away from home felt very long and slow. I felt the time freezing, as if the Earth was not rotating, but Thanks God, there’s a bright side for every story, because I was working with a wonderful team, on a very big brand, learning splendid recipes from a gifted chef.

I came back a week ago! I miss cooking so much that we had different menu everyday for breakfast, lunch, dinner and even dessert. My family and I are overwhelmed.

The first item I want to share with you after my return is Sfouf cake.

Sfouf are fun! It’s a Lebanese dessert known for its distinctive yellow color coming from the addition of turmeric. Sfouf can be enjoyed with milk, tea or coffee. It contains no eggs or no butter, mix the ingredients the way you like and make sure you will get a superb cake flavored with aniseed and turmeric spices; two of the healthiest spices available. Like many recipes, the quantities varies from a kitchen to another, but my mom’s recipe is simply the best☺

Sfouf (Sfoof)

Ingredients:

  • 3 cups Semolina Flour
  • 3 cup Flour
  • 1cup Vegetable oil
  • 1 tbsp Turmeric (a.k.a Curcuma)
  • 2 tsp Baking powder
  • 2 tsp Aniseed (ground)
  • 1 tsp Vanilla
  • 2 cups Sugar
  • 21/2 cups Milk (or water)
  • 2 tbsp Tahina (sesame paste)
  • Sesame seeds, Slivered almonds or Pine nuts, to garnish

Directions:

1. Preheat oven to 180C

2. In a bowl, mix semolina, flour, turmeric, baking powder, aniseed and vanilla. Add oil and stir to make a paste.

3. In a separate bowl, melt sugar in cold milk. Add gradually to the flour and spices paste and mix using an electric cake mixer.

4. Grease the baking dish with Tahina and pour batter. Make sure it’s flat and even. Sprinkle with sesame, pine nuts or decorate with almonds.

5. Bake for approximately 30 minutes, or until golden-brown. Allow to cool for 15 minutes. Cut in pieces like you do for brownies and serve.

Please note, this same recipe can be done without milk. Just dilute sugar and aniseed in water and add it to the flour and spices mixture.


Apple Walnut Cake

This is another one of my favorite cakes, if it happens that I bake it for someone, I have to bring along several copies of the recipes. Not anymore! It’s on the web now:)

It’s light and moist, not too sweet, spiced with cinnamon and loaded with chopped walnuts and chunks of apples.

There’s not much to add to my monologue today! I had this recipe for so long and never changed a thing in it. I just love it!

The only thing I recommend is that to make sure that your walnuts are fresh, cause old ones might ruin the whole taste of your cake.

And this is how I make it!

INGREDIENTS:

  • 1 cup light brown sugar, firmly packed
  • 1/2 cup vegetable oil
  • 2 eggs, lightly beaten
  • 1 teaspoon vanilla extract
  • 2 cups all-purpose flour
  • 3/4 teaspoon baking soda
  • 1/2 teaspoon baking powder
  • 1 teaspoon ground cinnamon
  • 1/2 cup milk
  • 2 cups finely chopped apple
  • 1 cup chopped walnuts
  • 1 cup raisins

PREPARATION:

1. Grease and flour a 13x9x2-inch baking pan (or a 7inch/18cm round pan)

2. In a large mixing bowl, combine sugar and oil. Beat in eggs and vanilla with a wooden spoon.

3. Into another bowl sift flour, baking soda, baking powder, and cinnamon.

4. Stir into egg mixture alternating with milk. Stir in apples, chopped walnuts, and raisins.

5. Spoon batter into prepared pan. Bake at 350° for about 45 minutes, until cake springs back when gently pressed with finger.

6. Let cool in pan on rack.

Sugar Sugar Cookies

Tomorrow, Kaia has her first bake sale at school this year. I always send with her cookies. They are easy to prepare, firm enough to transport and the students love them.

She loves helping, she rolls the dough skillfully and found out on her own that it’s better to dip the cookie cutter in flour before making shapes. My little munchkin has great tips to give away!!

This recipe is great for cookies coated with icing or decorated with sprinkles. Deliciousness in every single bite! I think that tiny pinch of salt added, changes all the taste and makes it a show-stopper for everyone.

If you use chilled butter your dough should come out firm. If it happens that it’s soft, chill the dough for half an hour before start working with it.

You might like to sprinkle crystal sugar or colored sugar before baking the cookies, to add a sparkle. Easiest cookies recipe ever!

And this is how I make it.

Makes around 30 pieces.

Ingredients

  • 200g / (2 sticks) unsalted butter, diced
  • 1 ½ cups sugar
  • 1 egg, lightly beaten
  • 1 ½ tsp vanilla
  • 2 ¾ cups all-purpose-flour, sifted twice
  • 2 tsp baking powder
  • 1 tsp salt

Preparation

  1. Pre-heat oven to 180°C / 350°F, and place rack in the center of the oven. Line baking trays with parchment paper.
  2. Cream butter with sugar until light and fluffy.
  3. Beat in egg and vanilla.
  4. Add flour, baking powder and salt. Mix until a dough is formed.
  5. Divide dough into 2 balls. On a lightly floured surface, roll out each ball to an approximate thickness of 1/4 inch (6 mm). Dip cookie cutter in flour before cutting out shapes and transfer to baking sheets.
  6. Bake cookies 10 to 12 minutes (depending on size) or until edges are firm and cookies are dry to the touch. Do not let cookies color.
  7. Cool on sheets 1 minute; transfer to a wire rack to cool completely.

Note: If you’re using large cookie cutters, place the baking sheets with the unbaked cookies inside the refrigerator for about 10 minutes to chill. This will prevent the dough from spreading and loosing shape while cooking.

Lemon Cake

Serge just came back from Dubai and got me this new Bundt® pan from Nordicware. I know a normal woman would cheer up over jewelry, a designer’s bag or a perfume but definitely not a pan! Hearing me shouting: “YESSS!! For meeee!!”. How many of you would have guessed that my gift could have been a baking pan, really? Come on!

I’m sure some of you would have thought giving a BANG! on the hubby’s head just for the thought of it hihihi… well not me! I’m a proud wife today, and I’m really happy to bake a lemon cake inside my new pan.

I love the preparation of this cake, the smell of the lemon zest is irresistible!

Ingredients

  • 1/2 cup (1 stick/ 100gms) unsalted butter, at room temperature, diced
  • 2 cups sugar
  • 1 tsp vanilla
  • 6 eggs
  • Zest of 4 lemons
  • 100g white chocolate, melted
  • 3 cups all-purpose flour
  • 1/2 tsp baking powder
  • 1/2 tsp baking soda
  • 1/2 tsp salt
  • 3/4 cup full fat milk
  • 1/4 cup limoncello
  • Icing Sugar, to dust

Preparation

1. Preheat the oven to 185 degrees C. Grease and flour a 12-cup pan.

2. In a large bowl, using a hand mixer or a stand mixer, beat butter and sugar together until light and fluffy, about 3 minutes. Beat in eggs, one at a time. Beat in vanilla.

3. Add the lemon peel and the white chocolate. Mix until incorporated.

4. Sift flour, baking powder, baking soda, and salt in a large bowl. Set aside.

5. In a measuring cup combine the milk and the limoncello. Add to butter mixture alternating with flour. Beat until well mixed, making sure to scrape down the bowl with a spatula.

6. Bake for 1 hour or until a toothpick inserted in the center comes out clean. 7. Remove the cake from the oven and let it cool on a wire rack for ten minutes, then remove it from the pan and let it cool completely before dusting with icing sugar.

The Italian Saga: Lemon Panna Cotta With Strawberries

As sophisticated as it looks, Panna cotta is unbelievably easy to make.

Fabulous for dinner parties and can be made a day or two in advance and kept in the refrigerator. I also love it because it’s a real versatile recipe that can be combined easily to whatever seasonal fruits available.

Perfectly served with caramel sauce, honey, tropical fruits, cappuccino, coconut, etc… but my favorite combo is Lemon Panna Cotta with Strawberries! The lemon’s affair with the strawberry is scandalous. This recipe is irresistible and I haven’t found one person who doesn’t absolutely love it! I served it yesterday to my guests, and they practically licked the flute clean:) I love this feeling. Satisfying!

This recipe is pretty much my own after I’ve tried so many others from books and websites, it’s easy and delicious.

That’s the beauty of Tuscan cooking: simple and effortless. Enjoy!

Ingredients

Lemon Panna Cotta

  • 1 ½ tsp unflavored gelatin
  • 2 tbsp cold water
  • 1 cup heavy cream
  • 1 cup whole milk
  • 1/2 cup sugar
  • 
1 tsp vanilla extract
  • 2 tbsps limoncello
  • 
1 tbsp lemon peel, grated
  • 1 cup sour cream

 Strawberry Coulis

  • 200g fresh strawberries, hulled, chopped small
  • 10g butter (optional)
  • 3 tbsp brown sugar
  • 
1 tbsp lemon juice
  • 50g fresh strawberries, hulls removed and cut in half to decorate.

Preparation

  1. To make the strawberry coulis: In a medium saucepan, combine the strawberries, butter, sugar, and lemon juice. Cook over medium-high heat until the sauce becomes like a purée. Remove from the heat. If you like your coulis thin, strain it or blend it swiftly with a stick hand blender.
  2. To make the Panna Cotta: Sprinkle the powdered gelatin over the cold water and let soak for 5-10 minutes until soft.
  3. Pour the cream and the milk in the saucepan and heat until warm. Stir in the sugar and vanilla until dissolved.
  4. Remove from heat and stir in the soaked gelatine, limoncello, lemon peel and sour cream until smooth.
  5.  Pour into serving glasses (only half of 3/4 way) and refrigerate until firm. The time depends on the size of the glass, but be sure not to take it out too early.
  6. When the Panna Cotta has firmed, pour a layer of strawberry sauce over each treat and decorate with fresh strawberries. Let set up in refrigerator.


Delightful Rose Cakes

I have this baking pan, which I love from NordicWare, it makes Rose Cakes. Charming! Kaia is also crazy about it and would do me anything, including going to bed early, just to help me baking a cake in this special pan.

The below recipe came with the pan, I type it in here for you to try it. It can also be made in a regular muffin pan as well, so go ahead and take your chances. Alternatively you can buy the pan online it’s worth every penny!!


Ingredients

• 1 1/2 cups sugar

• 1 cup butter

• 5 eggs

• 3 cups flour

• 1 1/2 teaspoons baking powder

• 1 1/4 cups milk

• 2 teaspoons vanilla

• 1/3 cup raspberry or strawberry jam, divided in 2 portions

• Icing sugar (optional)

Cooking Directions

1.    Preheat oven to 325 degrees F / 180 degrees C.

2.    Grease and flour pan well.

3.    In large mixing bowl, combine sugar and butter and mix well.

4.    Add eggs, one at a time, mixing well after each one.

5.    Add remaining ingredients except jam and mix well, scraping bowl occasionally.

6.    Fill individual cups 2/3 full.

7.    Spoon half the jam (this recipe makes 2 batches) on top of the batter, dividing evenly between the cups.

8.    Gently swirl jam into the top of the batter, using the tip of a knife.

9.    Bake for 20-25 minutes or until toothpick inserted comes out clean; cool 10 minutes in pan; turn out and continue to cool.

10. Bake second batch.

11. Dust with icing sugar if desired.

Makes 24 cupcakes

New York-Style Crumb Cake

Shopping on 5th avenue is not the only thing I love about New York City, but also muffins, scones and cakes. Since it’s a food blog, I will have to skip the shopping tips and trends of the week news and put you on the fast track to sweet tooth news flash.

To all the cakes lovers out there, NYC is your haven!

Breakfast is my favorite meal of the day and I find a pleasure in the morning instead of having it at the hotel, to go out, walk Manhattan streets and stop by one of my preferred cafes to have my granola berries breakfast with a cinn raisin bagel (shortening of cinnamon-raisin bagel) and a cupcake or a slice of cake take away.

Nothing tastes as delicious as homemade New York-style crumb cake fresh from the oven, especially if prepared the old-fashioned way. Paired with home made berries jam and sprinkled with fine crumbles and icing sugar. Mmmmm, luscious!

Get ready to be transported to a fluffy bliss with this stylish cake recipe.

New York-style crumb cake

Ingredients

Crumble:

  • 2 cups flour
  • 1 cup brown sugar
  • Pinch of Salt
  • 1tbsp ground cinnamon
  • 1 ½ sticks / 150g unsalted butter, melted

Cake:

  • 2 and a half cups of flour
  • 1 tsp baking soda
  • Pinch of salt
  • 1 ½ cup white sugar
  • 1 and a half stick of unsalted butter
  • 3 eggs
  • 1 tsp vanilla
  • 2/3 cup sour cream
  • Icing sugar for dusting

1. Preheat the oven to 180C/350F/Gas 4.

2. Grease a baking pan.

3. Make the crumb topping: In a bowl, combine together flour, cinnamon, sugar and salt. Pour warm melted butter over mixture and rub with your fingers to make medium and large clumps.

4. Whisk together flour, baking soda and salt.

5. In a separate bowl, beat sugar and butter until fluffy. Add eggs one at a time, then vanilla. Beat in flour mixture alternating with sour cream until well combined.

6. Pour batter in the baking pan and sprinkle the crumbles evenly.

7. Bake in the oven for 40-45 minutes until the crumble is browned and the skewer inserted into the centre of the cup cake comes out clean.

8. Transfer to a wire rack and wait until cool.

9. Dust with icing sugar. Serve.

Try it with a touch of jelly. Once you pour the batter in the baking tray, spoon the jam over it and finish with sprinkling the crumbs.